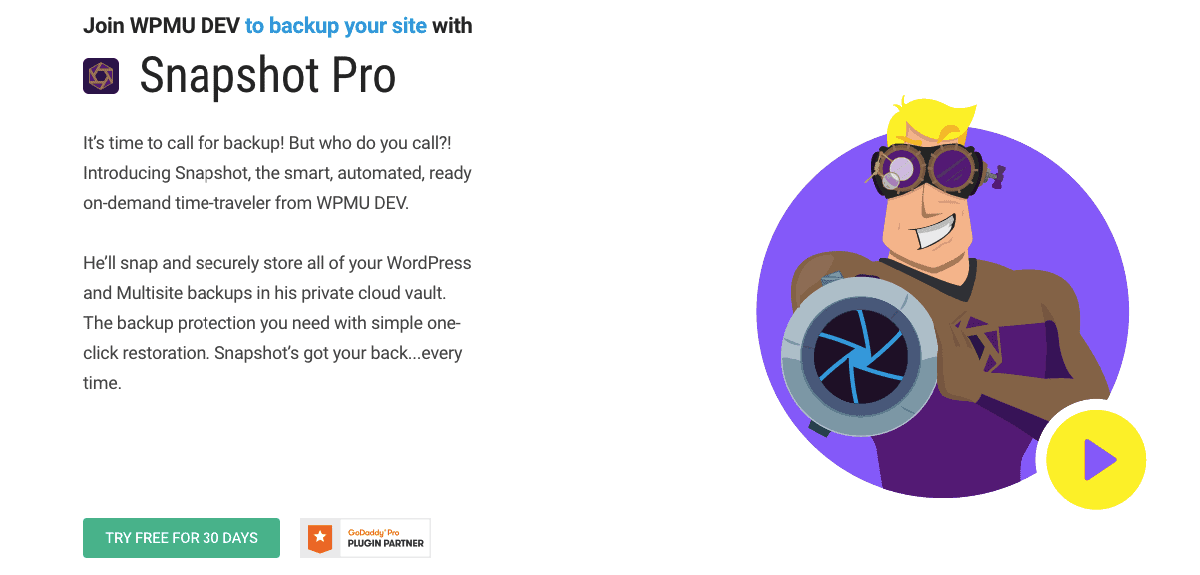
When it comes to WordPress backup plugins, you’ve probably had your fair share of examples over the years. Sure – you can always take a chance, install a third-party service, and hope for the best. But when it comes to playing your cards wisely, there’s really no point in going on a wild goose chase. The tried and tested, a reliable method is the way to go here, which means that you’d best consider using the good old Snapshot Pro as your backup plugin of choice, in fact, on for the latest WordPress companies FixRunner is using WPMUDEV products to improve and optimize the speed of many of their members.
Developed by the legendary powerhouse that is WPMU DEV, you know exactly what you’re getting and how you can benefit from it. In a nutshell, it’s a ready-on-demand, automated, smart time-traveler that not only snaps but also securely stores all of your Multisite and WordPress backups in its private cloud vaults. The best part? It comes with one-click restoration.
If we were to name a similar product, that would definitely be WP Reset.
 Although WP Reset is not a backup plugin, it does have the ability to create database snapshots that can be stored in a number of cloud services such as Dropbox, Google Drive, pCloud or the cloud controlled by the WP Reset team.
On top of that, WP Reset will also enable you to reset your entire site or just aspects of it using the numerous resetting tools it comes with. These tools range from a nuclear reset that will wipe your entire site clean, to partial resets that will remove things like plugins, themes, users, widgets, content, etc.
And as if all that wasn’t enough for one plugin, with WP Reset, you can also create plugin and theme collections which you can then install after a reset or whenever you see fit, with just a click.
Now, back to talking about the star of the show, Snapshot Pro!
What Can You Expect From This Exceptional WordPress Backup Plugin?
It is more than fair to say that Snapshot Pro is a premium product in every way imaginable, especially considering the fact that it hails from the same iconic company that has gifted us with numerous other equally impressive WordPress plugins like Smartcrawl, Smush Pro, Hummingbird, Defender and the like.
 As a result, it boasts every functionality and features you could possibly dream of when it comes to usability. It was engineered to remain flawlessly integrated with Amazon S3 and Dropbox cloud storage services and basically works like a time machine for your website. The restoration is made perfect and extremely easy, and everything remains well secured and updated with proper mention of the timestamp. What’s more, because it has integration for both SFTP and FTP, it can even keep the backups to these.
What Are The Basic Benefits Of Using Snapshot Pro?
The first thing that needs to be mentioned is that a single membership plan that includes this WordPress backup plugin also gets you a number of other premium themes and plugins at no additional cost. At the same time, it not only works with the Multisite concept, but it also comes with a separate configuration that supports such a setup. It doesn’t end there; Snapshot Pro can also keep everything well-arranged in a single place and can take scheduled backups, while you’ll also be able to benefit from a manual backup option.
You can also configure it with Google Drive storage, and there’s really no need to point out that that’s currently one of the best cloud storage services out there for a number of reasons. Widely regarded as one of the top contenders in Best WordPress Backup Plugins Compared 2019 and Best WordPress Dropbox Plugins Available in 2019, it also comes at a more than reasonable price when stacked against most competitors out there at the moment.
The Ins And Outs Of The Impressive WordPress Backup Plugin That Is Snapshot Pro
As aforementioned, having access to Pro features of Snapshot means that you’ll need an active WPMU DEV membership as the plugin needs access to WPMU DEV super servers in order to work its magic. Once you sort out the usual installation and activation of the plugin, take a look at your admin area, and you should see a new menu item there. If we’re talking about an activation on a single site install of WordPress, simply go to “Snapshot” and then “Settings.” On the other hand, if you’re going for Network Activated on a WordPress Multisite, you’ll have one more step: start by going to “Network Admin,” then “Snapshots,” and then once again “Settings.”
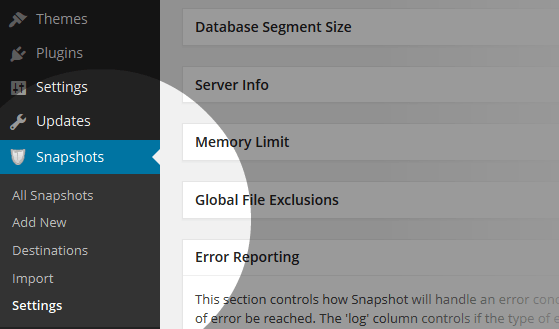 Settings Config
When going through the settings configuration, the first thing you’ll need to do is configure the actual folder where you want the backups to be done. In order to do that, click on “Settings.” Here you can basically customize the name of the folder; you’re able to play around and change it to anything you like. After that, the plugin will automatically move the files that have already been backed up in there. Pretty cool, right? Next, you’ll need to set how many records exactly get backed up per one request. Keep an eye out for the fact that this has the title “Database Segment Size.”
Segment Size
One way to define the Segment Size is to think of it as the number of rows to back up per table and then per request. The function of the Segment Size is very simple – it’s charged with controlling the processing of the backup whenever you create a new snapshot. During the process itself, the WordPress backup plugin will issue a request to the server to backup each table. When you create a new snapshot, you can see this in the progress metric.
There’s an important consideration here: This backup process will try to back up the table in one single step in most situations. However, there are some server configurations where either the table size is very large or the timeout is set very low. As a result, this prevents the backup process from completing. The good thing is that Snapshot was designed to anticipate and work around this, which is why the backup process will break up the requests into smaller-size “chunks of processing” that it will then request to the server.
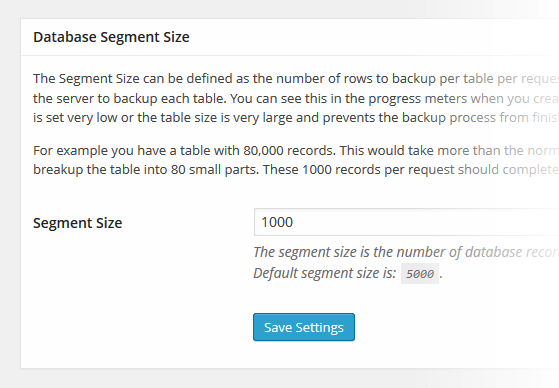 Here’s a practical example for better representation: let’s assume you have a table containing 80,000 records. Considering that most servers allow around 3 minutes or less to process a single request, this size of a table would take far more. This is where Snapshot’s smart design comes in; setting the segment size to, let’s say 1,000, means that the plugin will end up breaking the table into 80 small parts. The end result? You’ll have 1,000 records per request, which should complete well within the allowed timeout period of the server.
Server Info
Server info is the next section that basically tells you every single piece of information you might want or need to know about the particular configuration of your install. Should any issues whatsoever arise during any point of you using the plugin, this is information that can prove very useful when you contact support, and they ask you more about the details of your configuration.
Following the server info, you’ll arrive at a segment where you’ll be able to set a new memory limit. This is important because it goes without saying that you will need more PHP memory for processing if your overall database is continuously growing in size. The other alternative is that PHP will simply time out with memory errors if there’s not enough memory available for processing.
Global File Exclusions
The Global File Exclusions settings area is designed to let you specify either directories or files that will automatically be excluded from any and all snapshot configurations. That said, you’re also able to set up exclusions that will be specific to a single snapshot (you can do this by using the configuration screen). The way that the exclude logic works by pattern matching. In other words, you can simply use the parent directory or filename to achieve this rather than entering the complete server pathname for your desired directory or file.
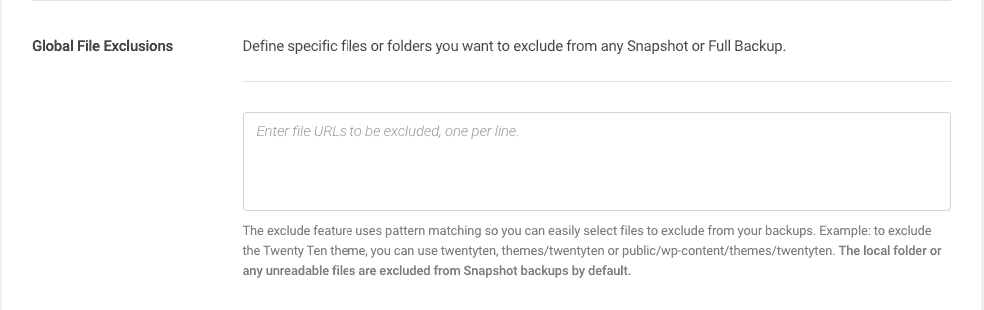 Here’s an example: Let’s say you want to exclude the theme twentyten. In order to do this, you could enter it in one of many ways: /var/www/wp-content/themes/twentyten, /wp-content/themes/twentyten, themes/twentyten, or simply twentyten.
IMPORTANT NOTE: Regular Expression are not allowed here.
Error Reporting
The section named “Error Reporting” serves to control how this WordPress backup plugin is to handle an error condition during the backup/restore processing.
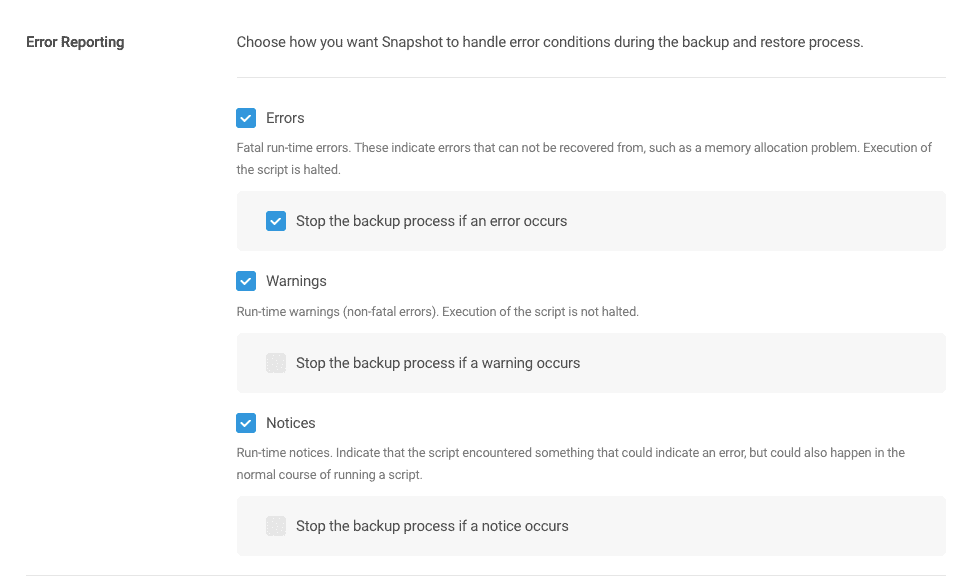 Each type of possible error has two columns. For example, the “Log” column is set up to control whether the type of error and all accompanying details will be written into the processing log. On the other hand, the “Stop” column is designed to control whether Snapshot will abort (stop) the current process if that type of error is reached. In the great majority of cases, the most effective course of action here is to set “Stop” ONLY for Errors and then “Log” for all.
Compression Library
As the name implies, the role of the final section dubbed Compression Library is to allow you to manually select which zip compression library is to be used for the process. Snapshot uses the zip library during the backup and restores processing. Generally speaking, and in most cases, PclZIP is not only slower than the ZipArchive, but the latter is also built directly into PHP. It also uses files while PclZIP compresses large files by using memory for temporary storage.
Following all of the settings mentioned above, you should be finished with configuring your WordPress backup plugin.
But What About Hosted Backups (Courtesy Of WPMU DEV)?
Among the more recent releases of Snapshot updates, it is able to integrate into the company’s latest backup service. This is a service designed to allow users to store up to 10GB of backups in WPMU DEV’s own cloud. There’s yet another important consideration here: as of recently, this feature was still considered to be only a beta version; therefore, please don’t be surprised to find the occasional quirk or bug here and there as the service is still in development. That said, WPMU DEV never ceases to amaze clients with not only the effectiveness of its plugins but their usability and practicality as well, so feel free to share your experience (and any issues you may encounter with this feature) on the company’s support forums and they’ll surely be ironed out in no time at all.
Using the feature itself is incredibly simple. All you need are a few clicks of the mouse, and the hosted backup system will be yours to use as you see fit. There are, however, two conditions here that must be met in order for you to benefit from this feature in its entirety: the first is that you’ll need to be an active subscriber and the second is that you’ll also need to install WPMU DEV’s dashboard (if you haven’t already).
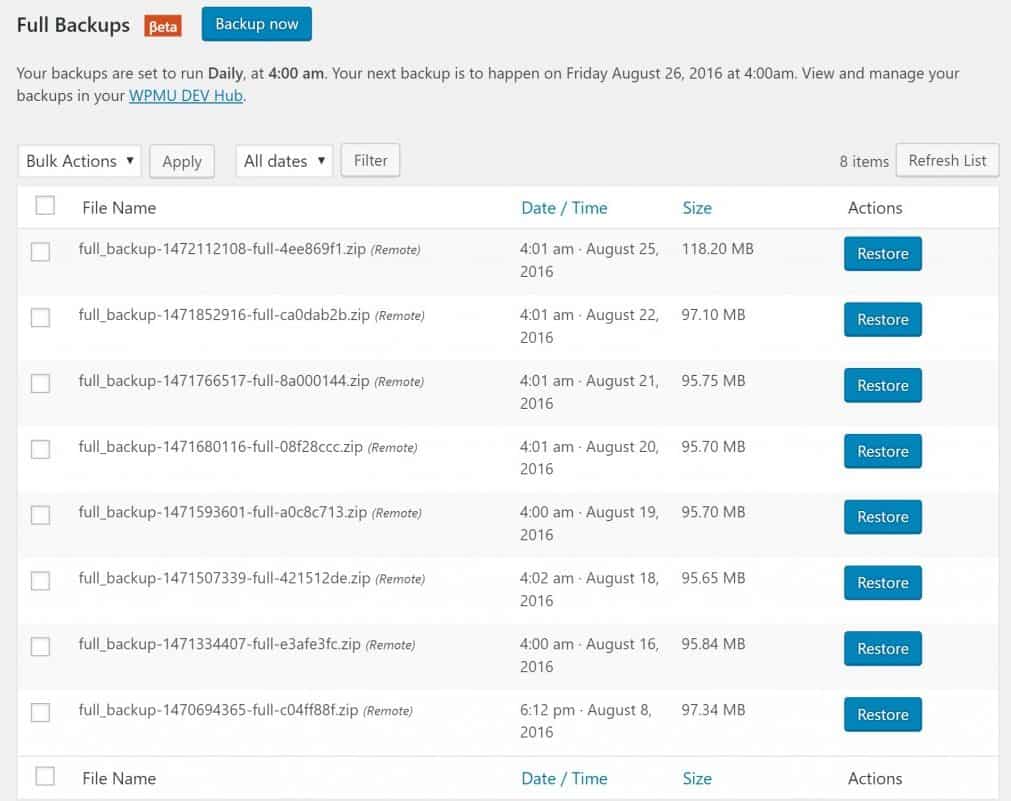
With that sorted out, the first step is to go to the WordPress backup plugin’s menu tab and click on “Full Backups.” This action will take you to the Settings page, but don’t worry – you’ll only need to concern yourself with three areas of the screen. The left-hand panel is the first, where general information about your Snapshot schedule will be on display. In addition to this, you’ll also find your current backup files here (once you’ve set up some backups, obviously). The second area of concern is the right-hand panel, where two boxes will be waiting for your input: one for creating a backup schedule and another for settings.
 The settings box is the first to pay attention to because here is where you’ll need to enter your Snapshot secret key. You’ll find a link here that will take you to WPMU DEV’s Hub, following a pup-up containing your Snapshot key, all ready to be copied. Another way to gain access to this is to go to My Websites tab in your Hub and then click on the site you’d like to add Snapshot backups to. All that’s left at that point is to select the Backups tab.
The schedule box, on the other hand, is where you’re able to opt between weekly and daily backups, as well as set a time when you would like the backup process to start. Here you’ll be able to manually choose the number of backups you’d want to store in the company’s cloud remotely. Additionally, here is also where you’ll be able to choose whether or not to enable logging – a thrifty little feature the company conveniently carried over from other destinations within this WordPress backup plugin.
Following the first successful creation of your first Snapshot backup – and of course, its successful upload to the company’s cloud – you’ll be free to restore it basically at your own leisure. You’ll be able to do this either from the My Websites tab in the hub or from the Snapshot archive on your site. Simple as that.
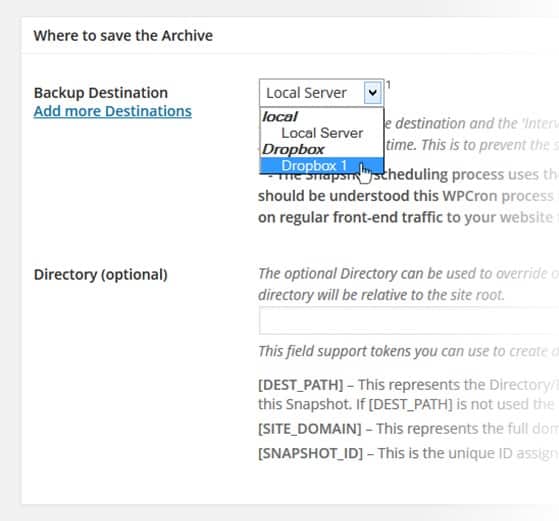
Destinations Of Your Snapshots
In order to ensure that your Snapshots are accessible and secure even if your server crashes, only external locations are used as destinations for storing the Snapshots. In other words, a destination is basically a remote system like any other; think GreenQloud, SFTP, Dropbox, or Amazon S3. The way you go about doing this is simply selecting the type of the destination and then filling in the details. Assigning a destination to your Snapshot is something you’ll be able to do whenever you add or edit each one. Moreover, the archive file will also be sent to your selected destination when the snapshot backup runs.

Setting up a destination is done by simply clicking the “Add Destination” button right next to your preferred service and then following the instructions. You might want to pause reading here and try setting up a destination for the next few steps.
IMPORTANT NOTE (regarding Google Drive destinations): make sure to double-check whether the Name and Directory ID are filled. If they aren’t, you might end up getting an error.
So, How Do I Start A Snapshot?
It’s as simple as can be: go to the Snapshot menu and click “Add New.” The next step involves you giving a name to your Snapshot. Since it’s all relative to you, it can be anything really, and it pretty much doesn’t matter what you call it. A typical way to do it is to make a couple of notes or maybe a reminder of what the Snapshot is for and what you’re performing with it.
 Following this, the next section will let you select which files exactly you wish to exclude or include in the Snapshot. Your choice will range from selecting specific files to be included, including on common files, to not including any files at all. A nice feature here is that you also have the option of listing additional files to be excluded from this snapshot. This comes in handy for excluding exceedingly large files (think videos) that are 2G in size that you may be hosting, but at the same time, know you have a backup somewhere else.
Then, it’ll be time to decide what tables you want to Snapshot (3 options to choose from). Opt to include selected database tables, all blog database tables in this archive (which will automatically include any new tables), and not include database tables at all. Choosing the 1st option (selected database tables) will further inquire you to select exactly which tables you want included. The last option (to not include tables at all) is for the ones for users, user meta, etc. (the default WordPress core tables). The middle option (all blog database tables in this archive) is for the extra tables added by plugins and themes.
Now it’s time to instruct this WordPress Backup Plugin when exactly to run and archive the desired backup. An important consideration to keep in mind when choosing the Backup Interval is that the WPCron (WordPress Cron) system is used by the Snapshot scheduling process. PLEASE KEEP IN MIND THAT WPCRON CAN BE IMPRECISE. In other words, scheduling a Snapshot for a specific minute of the hour doesn’t mean WPCron will execute at exactly that time. This because WPCron is designed to rely on regular front-end traffic to your website in order to commence the processing.
Here you’ll also be able to precisely state the total number of local archives you want to be kept for the specified snapshot. Older locally stored archives will be removed once the archive limit is reached. Typically, it’s a good idea to set the backup interval to once per week. Following this, try setting the number of archives to keep to 52 in order to have a year of backups. The trade-off to this type of method is that this will mean a ton of extra disk space will be needed if you have a large site.
Lastly, you’ll need to choose where you want your backup to be stored. Either choose any of the destinations you already have set up or just archive your backup locally in the Backup Destination dropdown. If you need to supplement or override the selected destination directory value, you can also use the optional Directory. After you go through all of your choices here and are happy with everything, simply click on “Create Snapshot.” Immediately after, you’ll be shown a new screen displaying the backup process as it’s chugging along.
 I Can’t Find My Snapshots/Restoring Snapshots
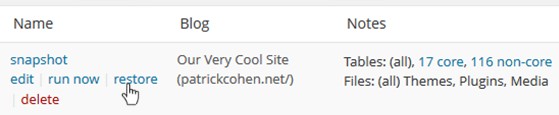
If you observe the Snapshot menu carefully, you’ll see an “All Snapshots” option. Clicking on this will result in a list of all of the Snapshots you’ve already archived up until that point. Additionally, clicking on the corresponding link will also enable you to view exactly which core & optional tables you backed up. Furthermore, links to either view the archive for a particular snapshot or download the snapshot to your computer will be located at the far right of each snapshot listed. It gets even better, though: you also have the option of just viewing or downloading the log of all actions performed during the backup itself.
 That’s All Fine And Dandy, But Can I Import A Snapshot?
If you’ve manually uploaded your Snapshots to your local folder or have them stored on a remote server, you’ll first need to import them in order for the plugin to recognize and show the archive in the All Snapshots menu. The important thing to remember here is that the remote archive you’re importing snapshots from must be publicly accessible in order for it to work (the import process does not support authentication as of yet). However, following the successful import from a remote server or scan from your local folder, you should receive a success message listing the imported results. And voila! You’ll be able to select your imported archive/perform operations on it, simple as that! All of this will be possible by accessing them from your All Snapshots page.