If you are running your business based on WordPress CMS, then you should have a live chat plugin installed. This is especially important for online stores and businesses that sell services. Simply, users will sometimes have doubts and want to ask about a product or service, and they usually expect an answer from a real person. The answer can be offered by anyone – by a chat operator, sales representative, or some other employee working in customer support.
There are a multitude of live chat plugins within the WordPress repository that you can install. However, it is important to note that most of these plugins do not have all the options to do our job smoothly. Some plugins have all the options but are expensive and unaffordable to most people, so small businesses and startup projects just can’t afford them.
There is a plugin that is affordable to everyone and has all the options that will satisfy even the most demanding users, and that plugin is called 3CX Live Chat.
3CX Live Chat plugin is a great tool for your WordPress sites that will allow you to provide perfect support to your clients and other visitors. You can provide support via live chat, audio calls, and if the need arises, a videoconference can be made so that more people can participate in solving problems and giving answers simultaneously.

It is important to note that 3CX Live Chat is a free plugin that you can download from the WordPress repository. What’s especially great about it is the fact that the majority of the features are available even within the free tier. If you choose to go ahead with the complete 3CX PBX system, however, there’s always a choice of available annual subscriptions that are calculated based on the number of simultaneous calls.
In its free version, the 3CX Live Chat plugin offers some of the options that competitors charge for. This sets this plugin apart from the competition, and you really need to give it a try. Some of the options that come with the free version of the plugin are:
- Simple user interface
- Ability to elevate a simple chat message to to phone or video call
- Customize your chatbox; you can adjust colors and add a logo to make the chatbox better integrated into your site
- Ability to create predefined offline messages
- Offline message storage system and the ability to revise all messages from before
- Add polls within the live chat
- Ability to add animations within the chat
- Possibility to accept or reject the conversation
- Separating agents by departments, displaying the image of the agent within the chat
Quite recently the 3CX Live Chat expanded its features with the addition of the 3CX StartUP package that combines the plugin and the web client. The 3CX Web Client is the new and improved, more streamlined version of the original 3CX Live Chat management console. It’s “cloud native” so it’s designed to be accessed from any browser on any device; you don’t need to log into your website’s dashboard. Keep in mind this is an added feature and doesn’t replace the robust console (which we’ll get into shortly).
It’s meant to make life easier for small businesses that don’t use much of the tools in the console. Now it’s easier to set up, easier to access, and easier to manage. And speaking of setting up, the whole thing gets done in mere minutes. The wizard will guide you through adding and configuring users, SIP trunk, and live chat (instantly adding the button to your site).
There are a total of three tiers to the StartUP package including a free solution that encompasses the core features most will be looking to use. Paying tiers are here for a couple of extra features that are quite good, but not crucial and those that deal with bigger scope, i.e. more users.
| STARTUP FREE | STARTUP PRO 10 | STARTUP PRO 20 |
| Shared Instance | Up to 10 users | Up to 20 users |
| Up to 10 users | Own SIP Trunk | $250 |
| Video conferencing | Multi Level IVR | |
| 1 Ring Group | Call Queues | |
| 1 Auto-attendant | Reporting | |
| 3CX Talk Links | $150 | |
| Live Chat | ||
| Mobile Apps | ||
| $0 |
The automatic 3CX StartUP connection gives you access to additional options such as switching chat to call or video call, the ability to answer the request via your mobile phone, and the ability to transfer the conversation to any other agent. In the text below, we will explain each of these advanced features.
Adding the ability to switch from chat to video call is very simple. You will need to configure some options. From the WordPress admin panel, open the plugin page, go to “Live Chat,” then to “Settings,” and find the “Advanced Features.” Activate the “Video, Phone, and Chat” option. If you want to enable only phone and chat, then select that option; video calls will not be enabled. Don’t forget to save the settings; your plugin has been successfully configured.
Answering queries over the phone is a great option, and configuring this option is very easy. This great plugin has apps for iOS and Android devices, and you can provide customer support from anywhere, wherever you are. The first step you need to do is to download the app from the App Store or Play Store. Once you have installed the app, you will be instructed to scan the QR code. Once you have scanned the QR code, the application requires you to make one “echo” call to ensure everything is working normally. After this step, your mobile application is configured.
One of the best options of this plugin is the ability to assign a chat to a specific agent or group of agents. This will increase the likelihood that each question from your users will be answered correctly. Not all support agents know how to answer all questions equally. Using this option, you can assign tasks to the chat agent you think would give the best information to the client. You must add several agents from the 3CX Web Client before activating this option. Once you have added agents, you need to create groups. Join the agents in the groups, and your job is done. Inside the chat window will be the “Transfer” option. If you want to assign a chat to another agent, click on “Transfer” and select the agent to whom you want to assign a chat.
As we mentioned in the text above, 3CX Live Chat is backed up by the 3CX StartUP edition offered free forever, unless you are opting for additional features with the PRO version.his offer includes an unlimited number of chats, mobile applications, web conferencing, Facebook integration, and many more. After the registration is complete, you can start the complete service in just a few minutes.
Signing up follows an easy step-by-step process:
- Sign up for your free StartUP account.
- Add your users or agents to the system and assign them roles (managers, receptionists, standard users). They will answer chat messages and use other system features.
- Determine if you’ll use a SIP Trunk, which is used for inbound and outbound calls. If you’ll be using the system just for Live Chat and internal communication simply skip this part and click on “Next”.
- Now you can start setting up your live chat by choosing the option “Yes” and selecting if you have a WordPress website or not. Enter your website URL and click “Set”.
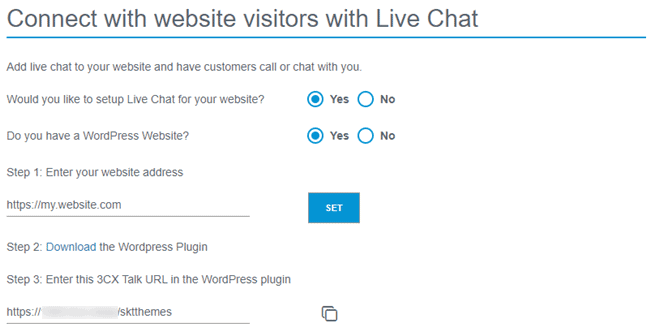
- You need to link the system to the plugin, so download and activate the plugin and then copy the 3CX Talk URL and save it for a later stage. The 3CX Talk link is what is used to link your website to your StartUP account. It creates the bridge that carries the chats, calls and video calls. All this from users browsers meaning there is no need for a telephone number to call.
- You’re done. Through the “Login” button you can access your dedicated 3CX Web Client which is the place all your customization options and chat messages are located.
While you’re within the client you can setup and configure your Live Chat
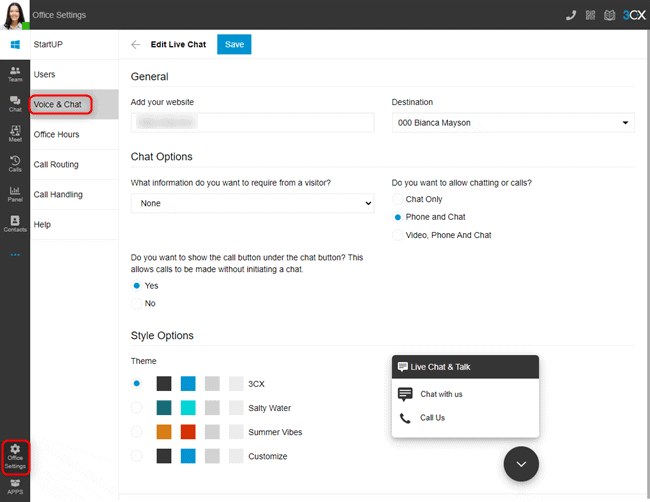
- To set up live chat so that calls and messages can be answered from the Web Client, go to “Office Settings > Voice & Chat” and click on the pencil icon.
- Your website address will already be populated from the wizard process, but you can amend this if required.
- The “Destination” field shows where live chat messages or calls will be sent. To amend the “Destination”, navigate to “Office Settings > Call Routing” and choose your destination. By default, the live chat will route to a ring group. For more information on ring groups, check out the getting started guide.
- Under the “Chat Options” section, use the drop-down selection to choose what information visitors need to provide you with.
- Use the radio buttons to choose if you want to allow “Chat Only”, “Phone and Chat”, or “Video, Phone, and Chat”.
- If you want the option for “Call Us” to be displayed immediately on the chat bubble, use the radio button to show or hide the option.
- Under “Style Options” choose from one of the 3 pre-defined themes or select “Customize”. For the last option, click on each of the color tiles and use the pop-up color picker or enter your RGB numbers.
- Use the preview of the chat bubble to interact and test the functionality. If you are happy, click “Save” at the top of the page.
The next step takes you back to WordPress and involves configuring your live chat options.
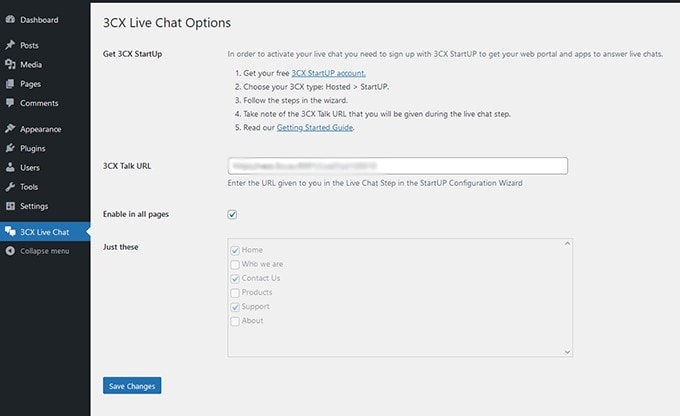
- Log in to the admin panel of your WordPress website
- Navigate to “Plugins” and click “Add New” at the top of the page
- Click on “Upload Plugin” at the top and choose the file you downloaded during the sign-up process beforehand. The same can also be obtained from the Web Client in “Office Settings > Voice & Chat” and click the ‘i’ icon next to the pencil icon. Then click “Install Now”
- Once installed, click on “3CX Live Chat NextGen” in the sidebar
- Paste the URL you copied earlier (the 3CX Talk URL). If you haven’t copied it, you can find it again in the Web Client in “Office Settings > Voice & Chat” under the “Information” field or within the confirmation email sent during the setup process.
- Either tick the box to show the chat on all pages or use the tick boxes below to select individual pages. Finally, click “Save Changes” and you’re done.
When you download Live Chat you’ll have the 3CX Web Client installed as well. The web client functions as your all-in-one interface for all communications which include CRM, Facebook messages, and SMS integration. Switching up where the data is traced will lighten the load on your site, because fewer resources are being used, which, in turn, leads to a faster site. Alternatively, it gives you the option to use more plugins and upload even more content, because the message tracing is redirected.
In addition to helping you regulate the speed of your site, a unified interface for multiple channels significantly simplifies your management requirements, allowing you to quickly access all the data you’ll ever need. Just imagine how much time you would lose by just switching through the different channels a couple of times a day.
Aside from all that, the web client will also enable you to create and keep track of groups within the business, add contacts, open up new chats, start calls, and even arrange video meetings. This makes it the perfect hub for internal communication and removes the need to use another, different plugin for those actions, again unburdening your WordPress backend.
Conclusion
Although there are many plugins for a live chat, in this text we have shown why 3CX Live Chat is much better than the competition. It’s a free solution, with features many others charge for and since nowadays a chat integration is essential for any site that looks to deal with their visitors directly, you simply can’t go without a service like this. Be sure to give 3CX Live Chat a shot, you won’t be disappointed.