Connecting Google Drive to your WordPress Media Library is a solution many website owners seek to enhance their content management experience. Integrating these two powerful platforms allows you to access your entire Google Drive repository directly from your WordPress dashboard, including images, photos, and other files. This integration streamlines your workflow and offers a secure way to share files with other WordPress users without compromising your Google account credentials.
This can significantly reduce the time and effort spent managing media assets. It provides an efficient method to expand your WordPress site’s storage capabilities and simplify file organisation. In this article, we’ll walk you through the straightforward process of linking your Google Drive to WordPress, empowering you to leverage the full potential of both platforms for your website.
Why Should You Connect Google Drive to WordPress Media Library?
Before discussing further how to connect Google Drive with your media library, it is important to know the reasons why you have to connect it.
- Streamlined workflow: Integrates Google Drive’s robust storage with WordPress, saving time on media management.
- Easy access: Access your entire Google Drive directly from the WordPress dashboard.
- Effortless incorporation: Add images to pages and posts with just a few clicks.
- Secure file sharing: Share files with contributors without compromising account security.
- Enhanced collaboration: Facilitate teamwork while maintaining account control.
- Simplified access management: Easily revoke access when needed, improving security.
- Efficient content management: Leverage the strengths of both platforms for a more effective system.
How to Connect Google Drive to Your WordPress Media Library?
Connecting Google Drive to WP Medi Library is easy with the WP Media Folder Cloud Addon Google Drive Integration.
This powerful combination of plugins and add-ons offers a seamless solution for accessing your Google Drive files directly from within WordPress. It provides easy access to your cloud-stored content and enhances your ability to manage and organize files. With this tool, you can create folders and structure your Google Drive content directly from your WordPress interface, streamlining your workflow and maximizing efficiency in content management.
#1. Install & Activate WP Media Folder Plugin
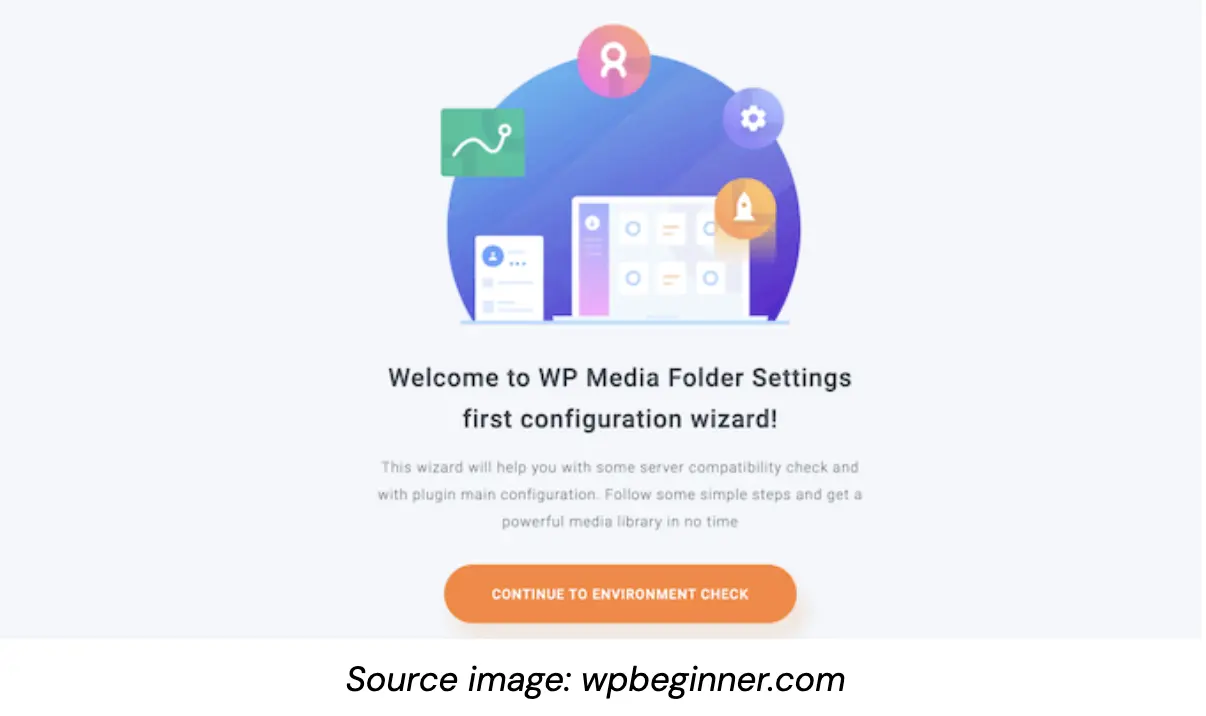
To begin integrating Google Drive with your WordPress media library, install and activate the WP Media Folder plugin. This powerful tool serves as the foundation for connecting Google Drive to WordPress, offering a user-friendly interface for managing and accessing your files seamlessly.
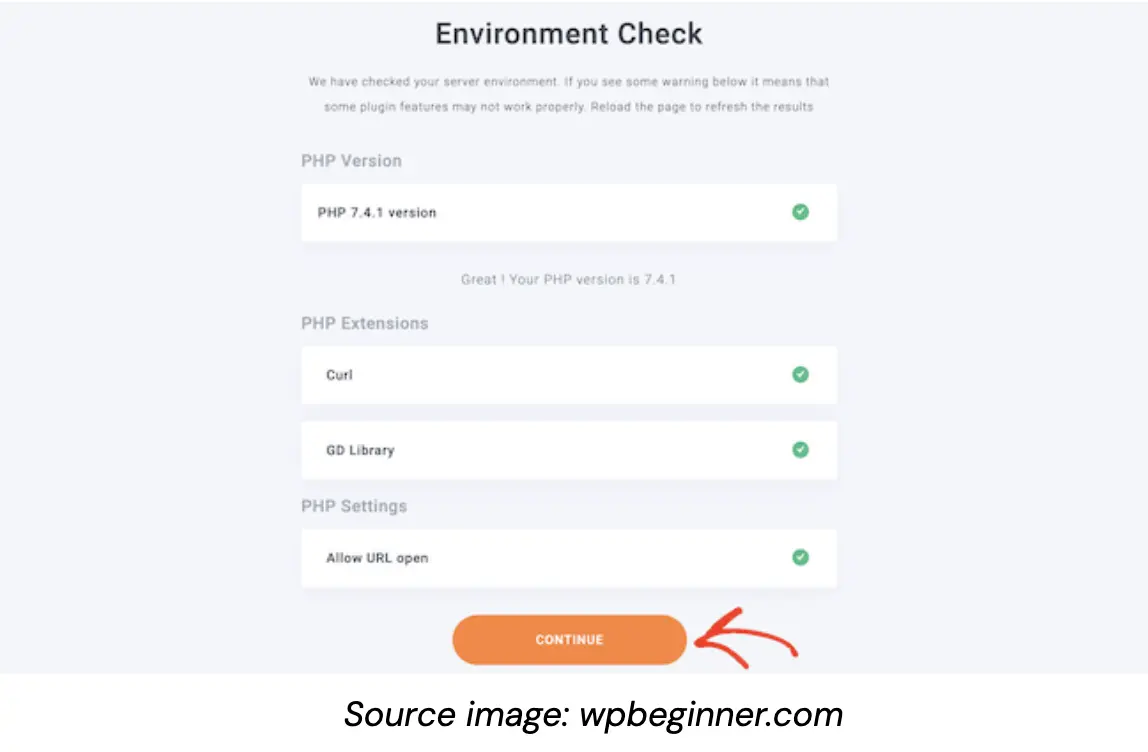
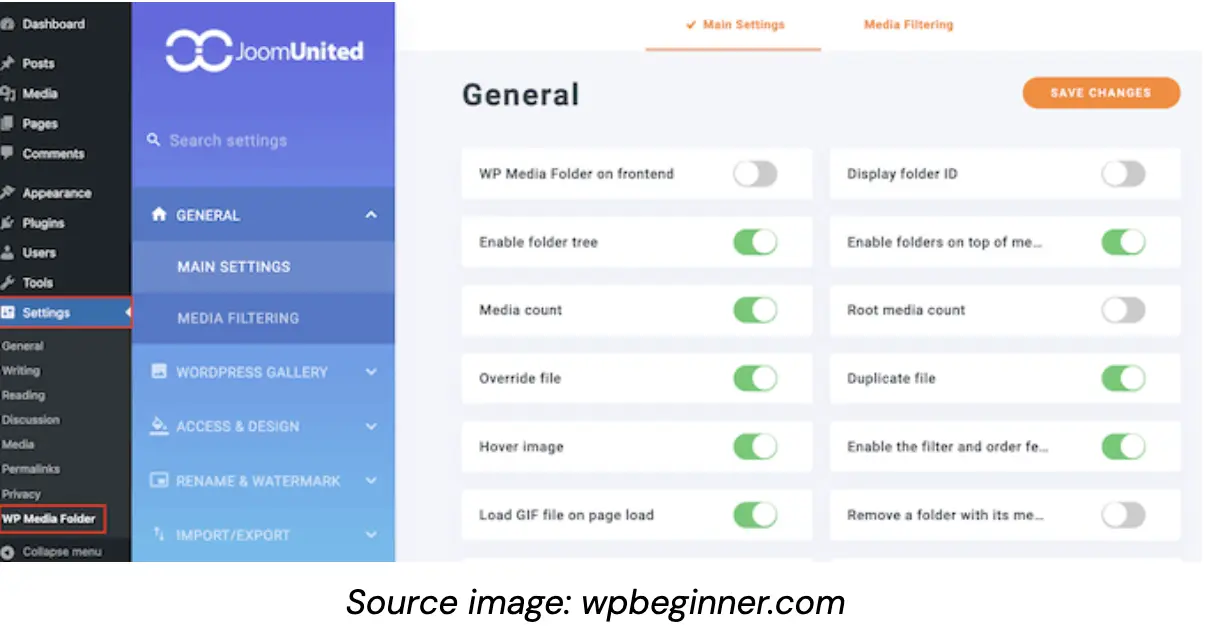
Once activated, you’ll be presented with a setup wizard. Initiate the process by selecting the ‘Continue to environment check’ button. The plugin will then analyze your WordPress setup, displaying information about your PHP version and installed extensions.
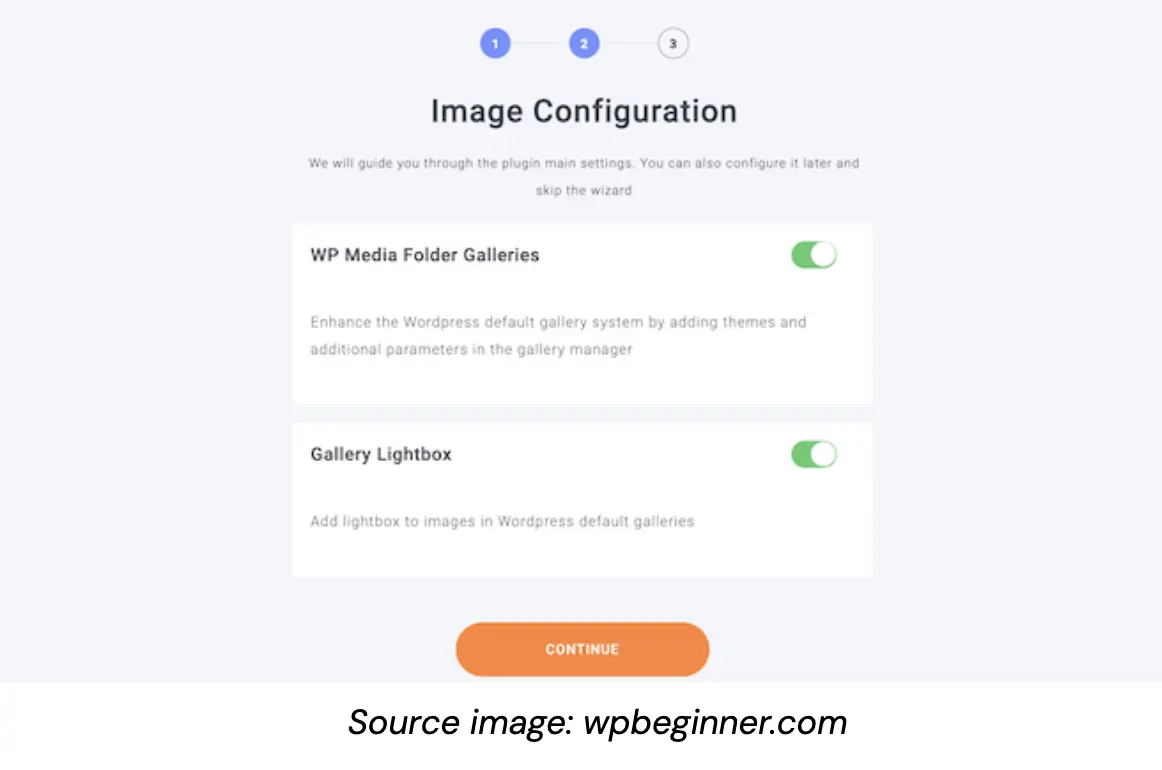
Proceed by clicking ‘Continue.’ You’ll then have the option to enable or disable the gallery and lightbox features. These tools are crucial for managing folders within your WordPress media library, so it’s advisable to keep them active.
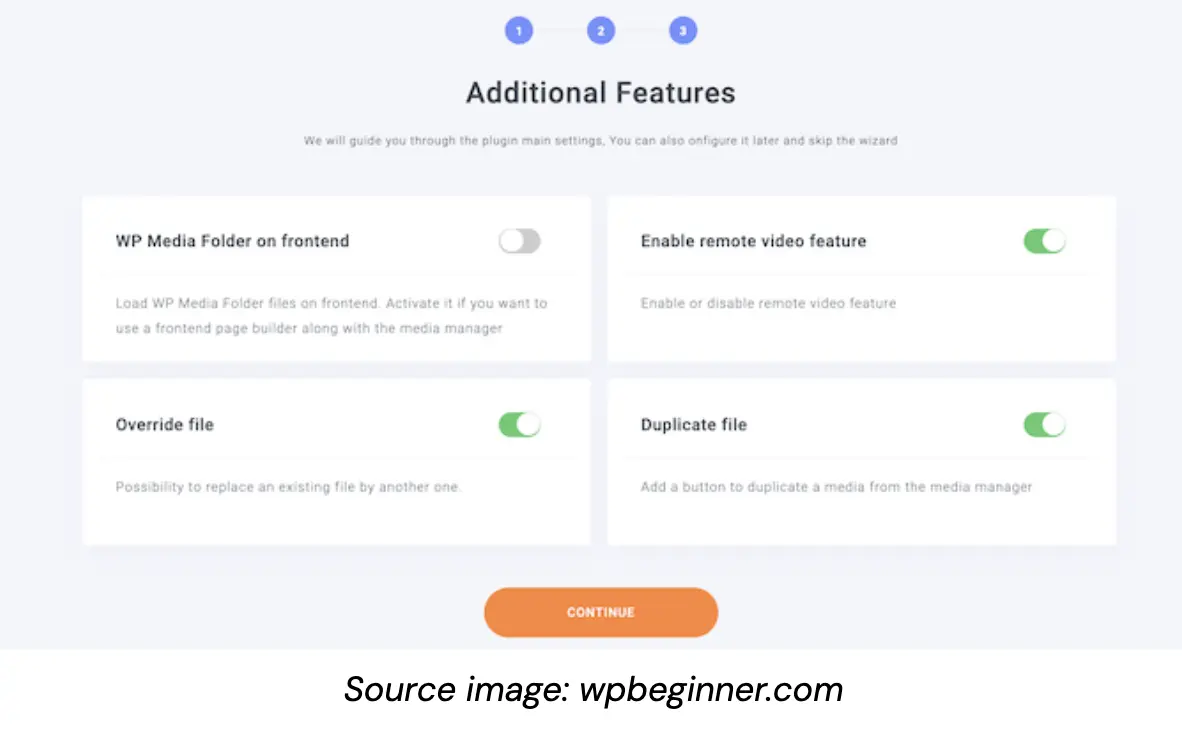
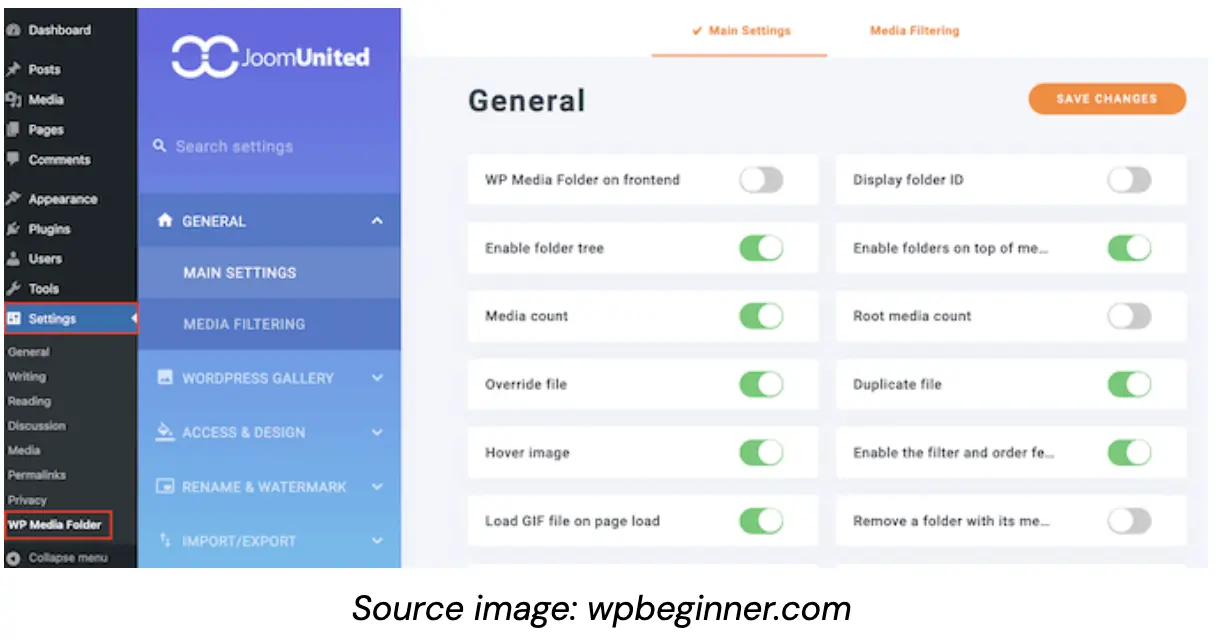
After making your selection, click ‘Continue’ again. The next screen will showcase additional features you might find useful. While the default settings are generally sufficient for most WordPress sites, you can activate extra functionalities using the provided toggles.
For instance, if you utilize a WordPress page builder, you might consider enabling the ‘WP Media Folder on frontend’ option.
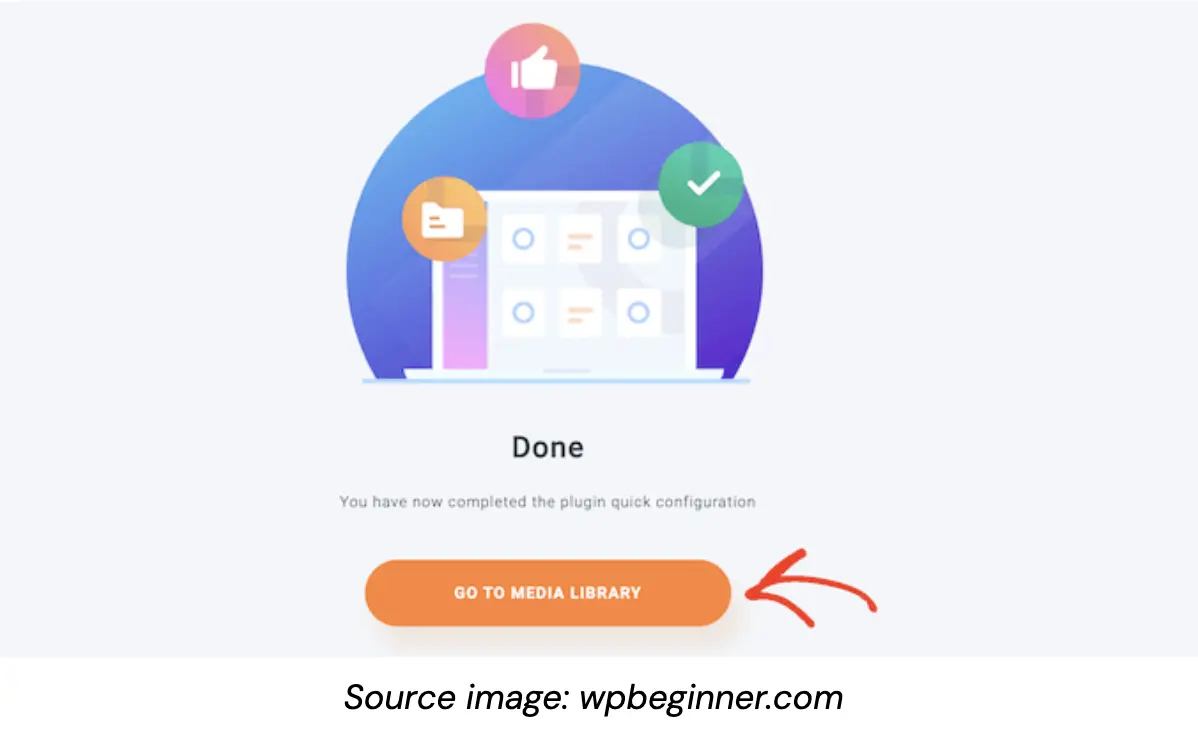
Once you’re satisfied with your choices, click ‘Continue’. Shortly after, you’ll see a confirmation message stating, ‘You have now completed the plugin quick configuration.’
To finalize the setup, click the ‘Go to Media Library’ button, which will direct you to your newly enhanced WordPress media management interface.
#2. Install & Activate the WP Media Folder Plugin Cloud Addon
After setting up the WP Media Folder plugin, the next crucial step is to install and activate the WP Media Folder Cloud addon. This addon can be added to your WordPress site using the standard plugin installation process.
The WP Media Folder system offers a convenient automatic connector, simplifying the process of linking WordPress to Google Drive without creating a project in the Google Cloud Console. This automated approach is generally recommended for its ease of use. However, if you encounter any issues with the automatic connector, don’t worry – we’ll provide instructions for manual connection later in this guide.
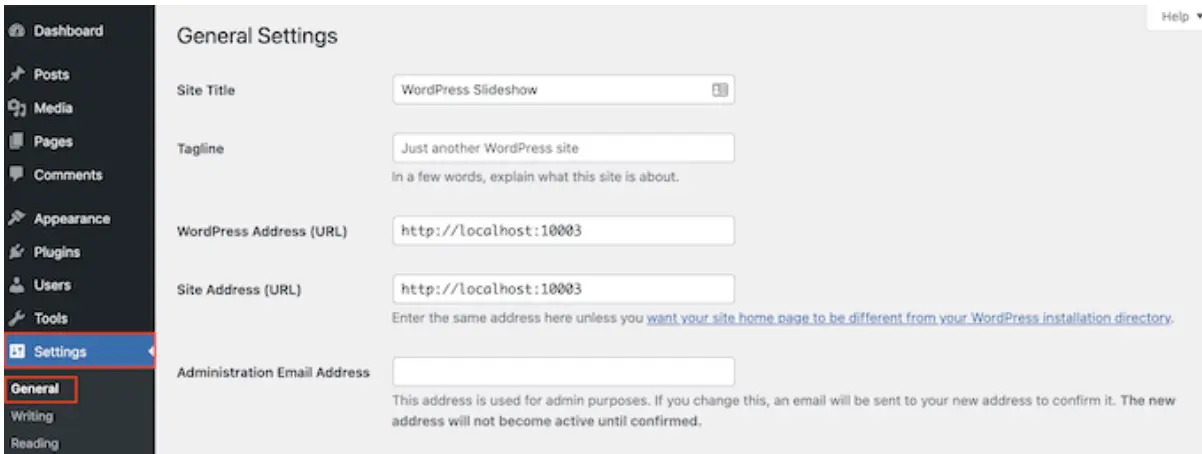
To initiate the Google Drive connection, navigate to your WordPress dashboard’s ‘Settings > General’ section.
Source image: wpbeginner.com
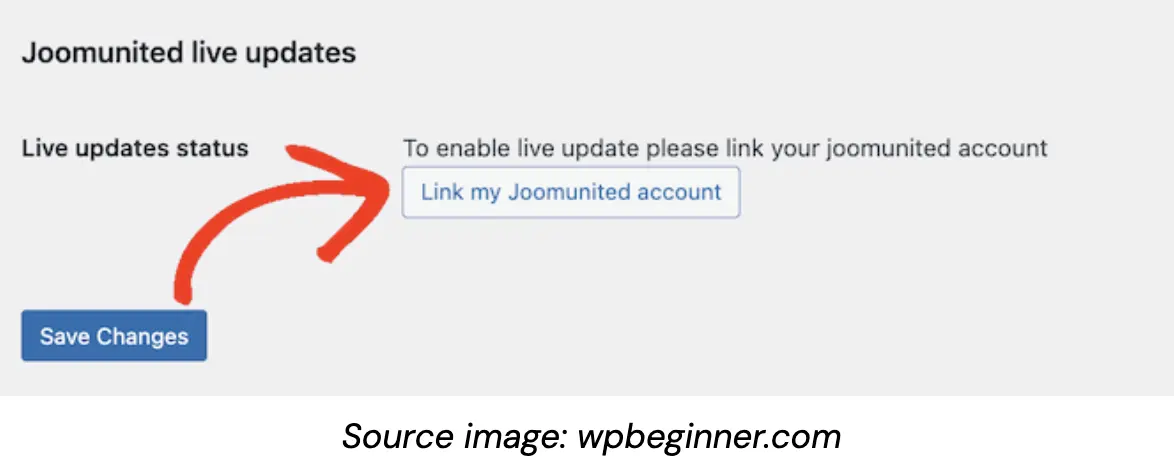
Scroll down until you find the ‘Joomunited live updates’ area. Here, you’ll see an option to ‘Link my Joomunited account.’ Click on this to proceed.
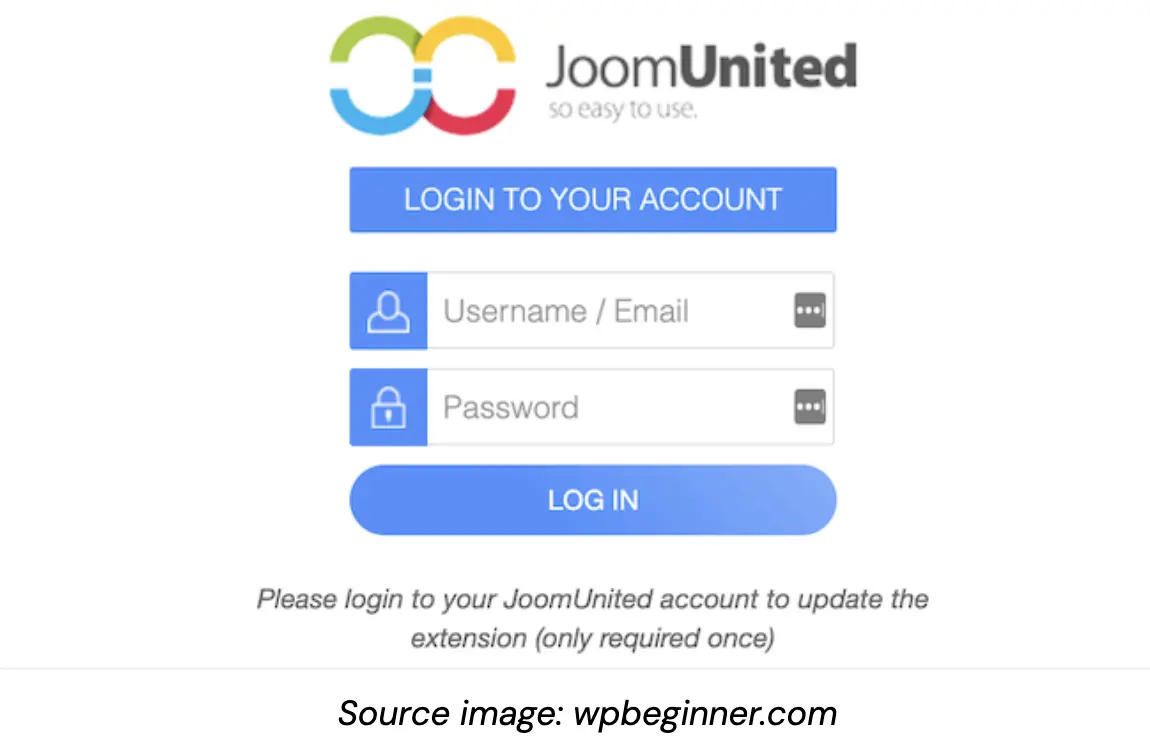
A popup window will appear, prompting you to enter your JoomUnited account credentials. Input your email and password, then click ‘Login’ to authenticate.
With your JoomUnited account linked, you’re ready to establish the connection between Google Drive and your WordPress blog. To begin this process, head to Settings > WP Media Folder.
Select ‘Cloud’, then ‘Google Drive’. On this page, you’ll see an ‘Automatic’ option – click on this to use the recommended automatic connection method.
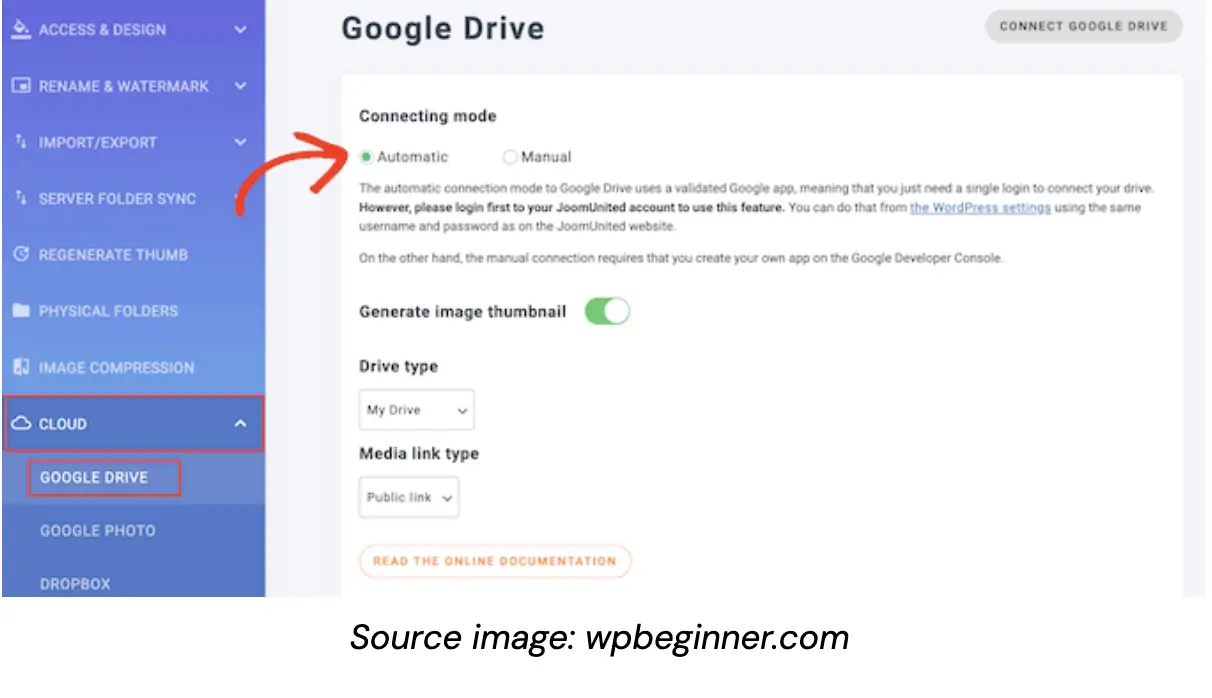
Finally, click the ‘Connect Google Drive’ button to complete the setup. This action will initiate the integration between your Google Drive account and your WordPress media library.
#3. Organize Your Google Drive Images
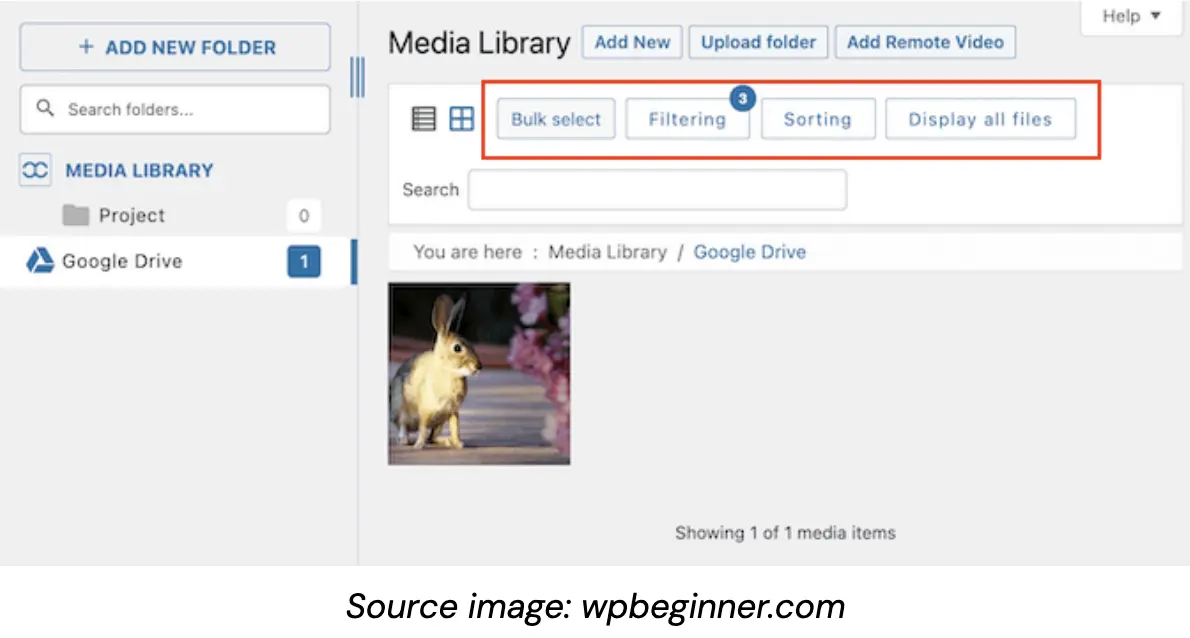
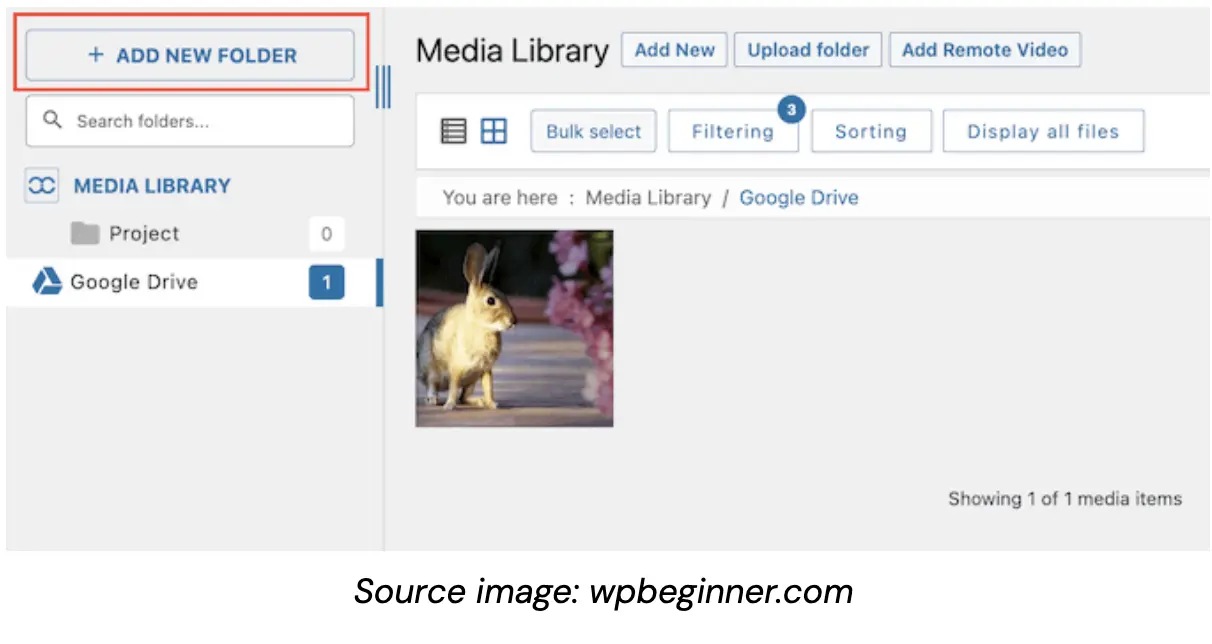
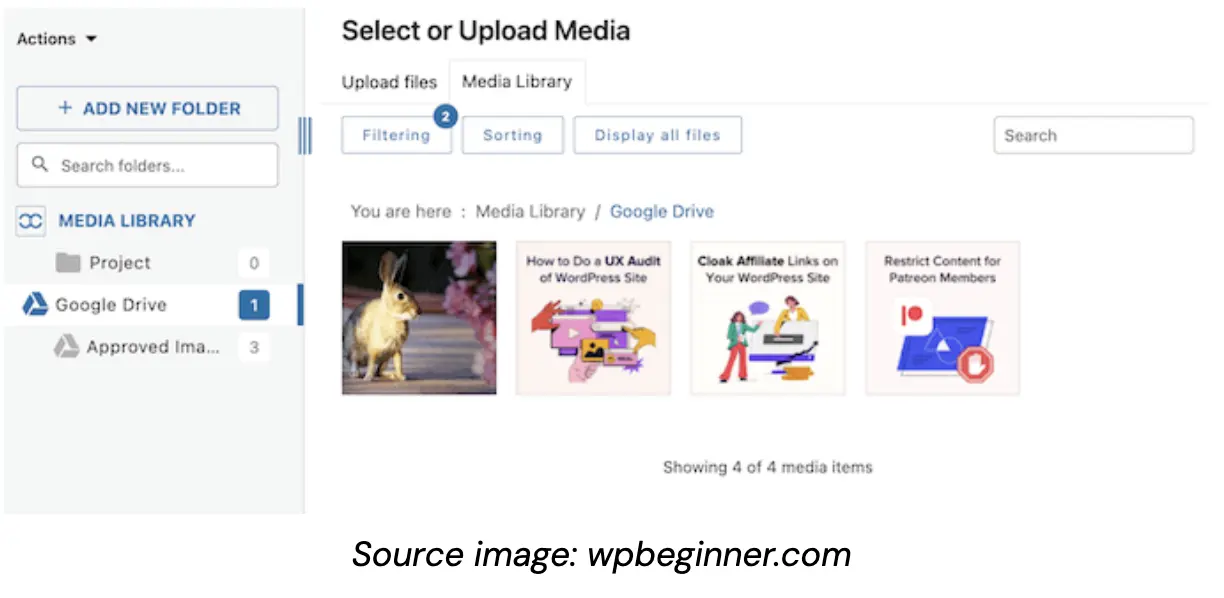
Now that you’ve established the connection with Google Drive, you can seamlessly access and manage your files directly from within the WordPress dashboard. To explore your newly integrated files, navigate to ‘Media > Library’ and look for the Google Drive like below.
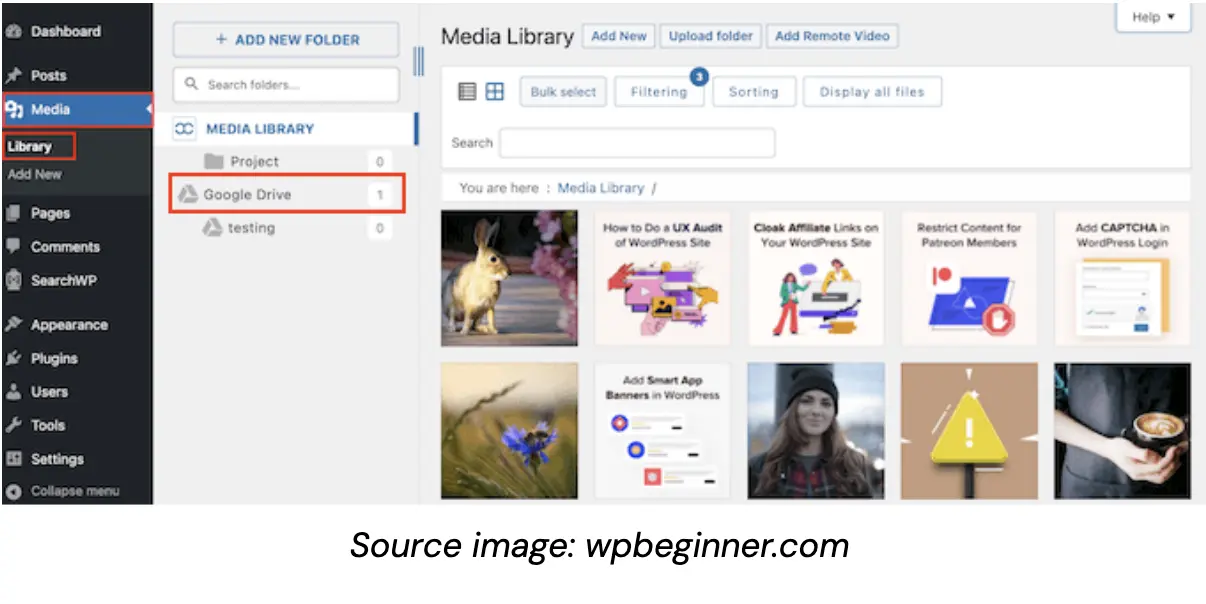
This interface allows you to browse through all the images stored in your Google Drive. A toolbar with various buttons lets you filter, sort, and display different file types, enhancing your ability to locate specific content quickly.
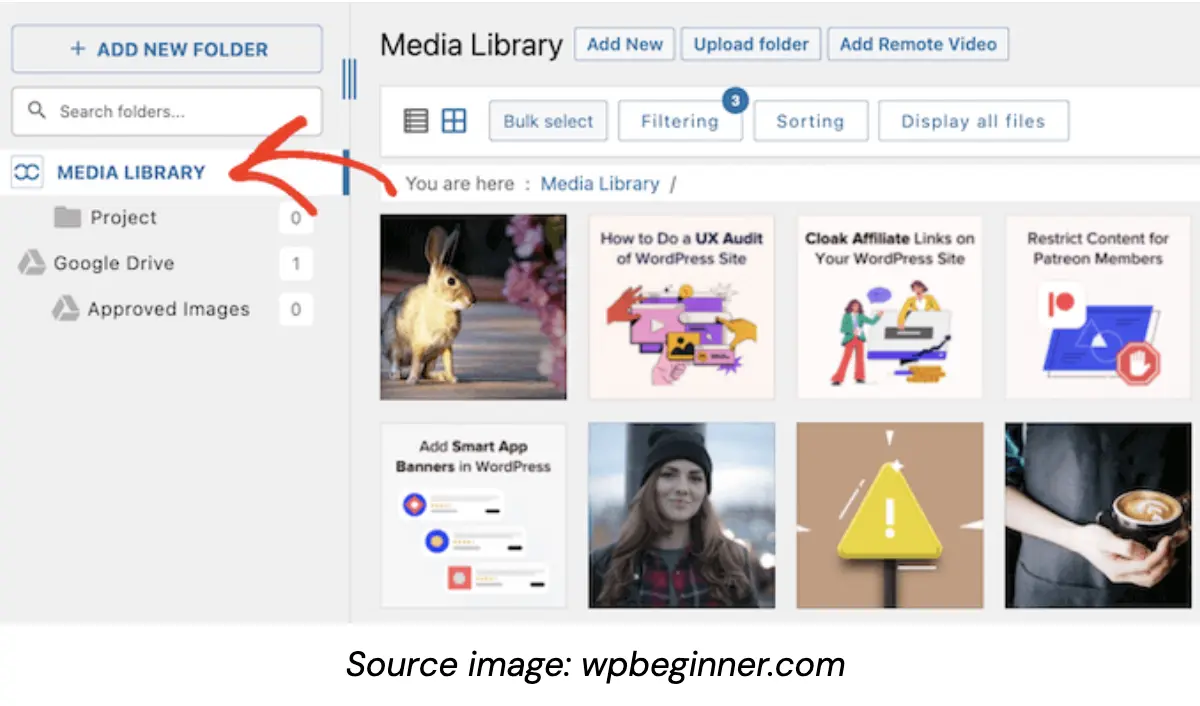
One of the key features of this integration is the ability to create and manage folders. Any organizational changes you make in the WordPress dashboard will automatically sync with your connected Google Drive account. This feature is particularly useful for team collaboration, as users can organize and manage images without needing direct access to the Google account.
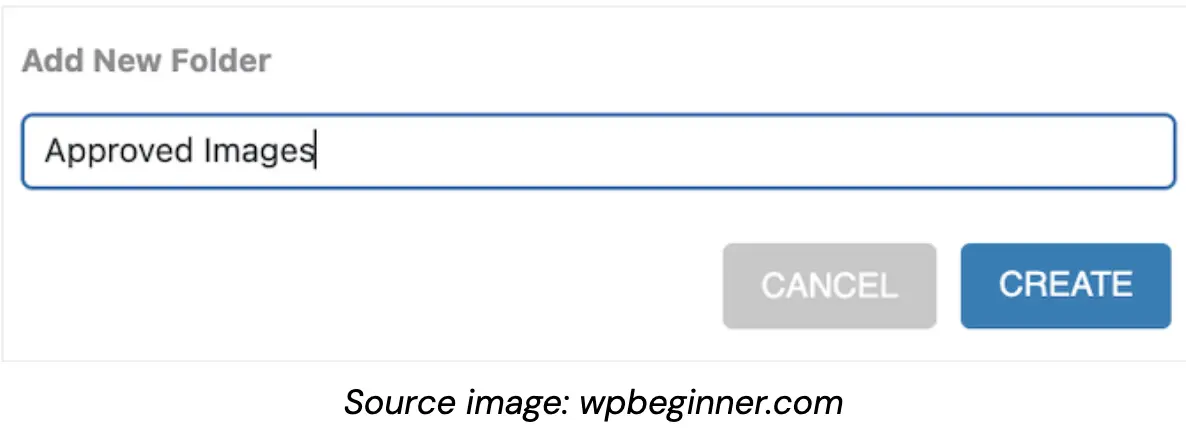
To create a new folder, simply click the ‘Add New Folder’ button. A popup will appear where you can name your new folder.
Click ‘Create’ to finalize, and the folder will be added under the Google Drive parent folder.
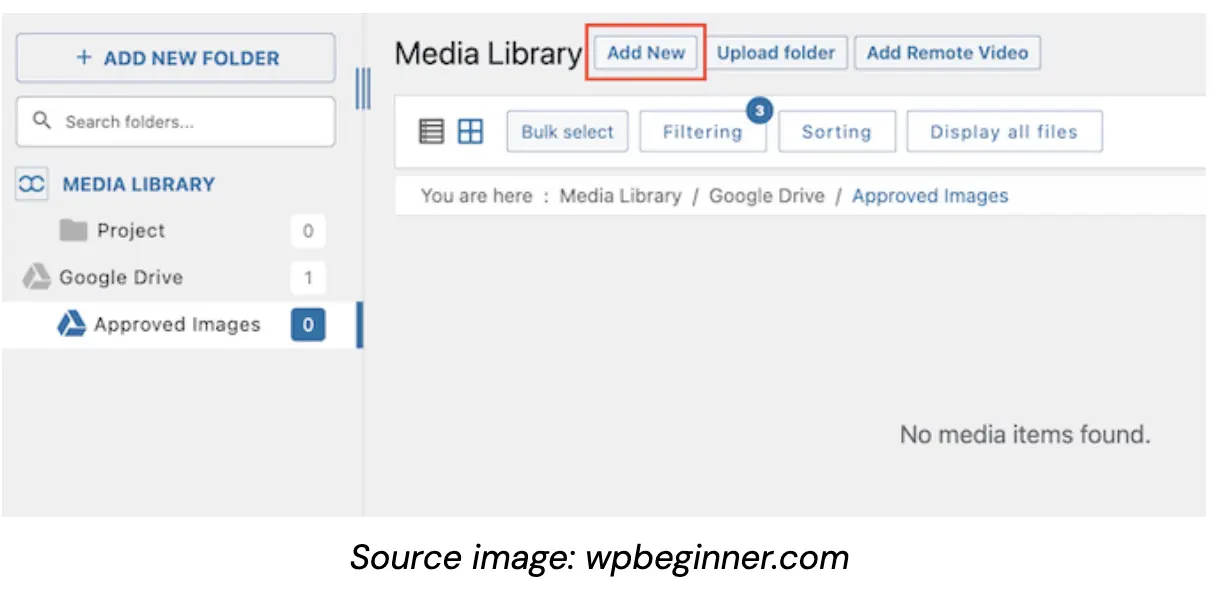
Adding images to your newly created folders is straightforward. Click the ‘Add New’ button and select a file from your local computer. This action will upload the image to both your WordPress media library and your Google Drive account simultaneously.
For those with existing WordPress websites containing numerous images, you can easily back up this content to Google Drive. Simply select ‘Media Library’, find the desired image, and drag and drop it into either the parent Google Drive folder or any sub-folder you’ve created.
You can repeat these steps, which help you organize all your WordPress media files within your integrated Google Drive structure, creating a more streamlined and backed-up media management system.
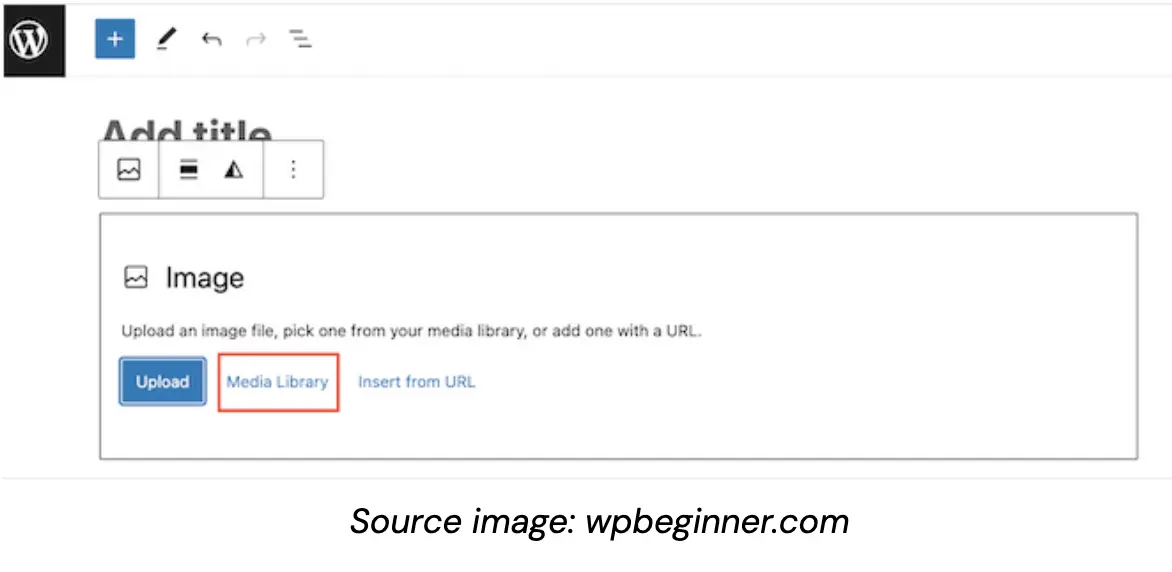
#4. Add Image from Google Drive to WordPress Website
Incorporating Google Drive images into your WordPress pages and posts is now seamless. Begin by inserting an Image block in the WordPress content editor, then click on the ‘Media Library’ button to access your integrated files.
Within the media library interface, you’ll find options to select ‘Google Drive’ or navigate to specific Google Drive folders you’ve created. This will display all the available media files from your connected Google Drive account.
To select an image, simply click on the desired file. You’ll then have the opportunity to enhance the image’s metadata, such as adding alt text or captions, just as you would with any standard WordPress image.
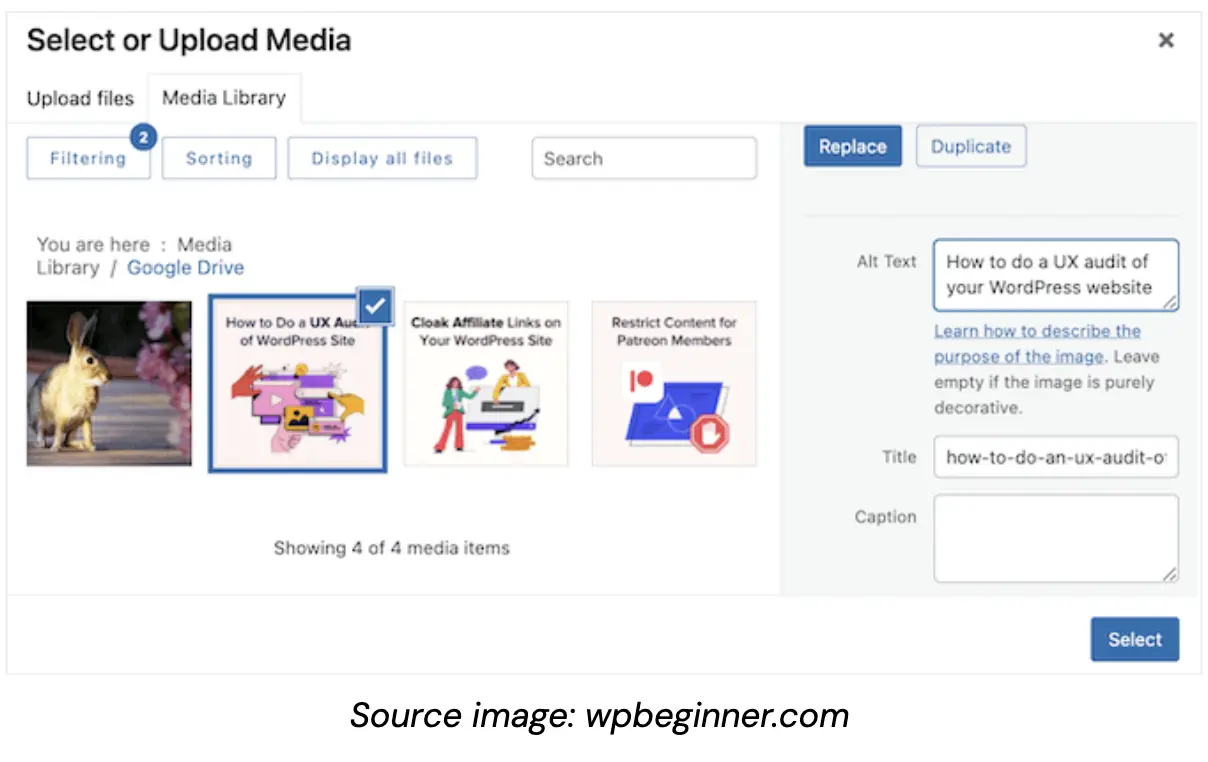
Once you’ve made your selections and adjustments, click the ‘Select’ button. The WP Media Folder plugin will then seamlessly insert the chosen Google Drive image into your WordPress page or post.
How to Manually Connect Google Drive to Your WordPress Media Library
If you prefer not to utilize WP Media Folder’s automatic connector, you have the option to manually establish a connection to Google Drive through the Google Cloud Console. This process begins with creating a Google Cloud Project.
#1 Create a Google Cloud Project
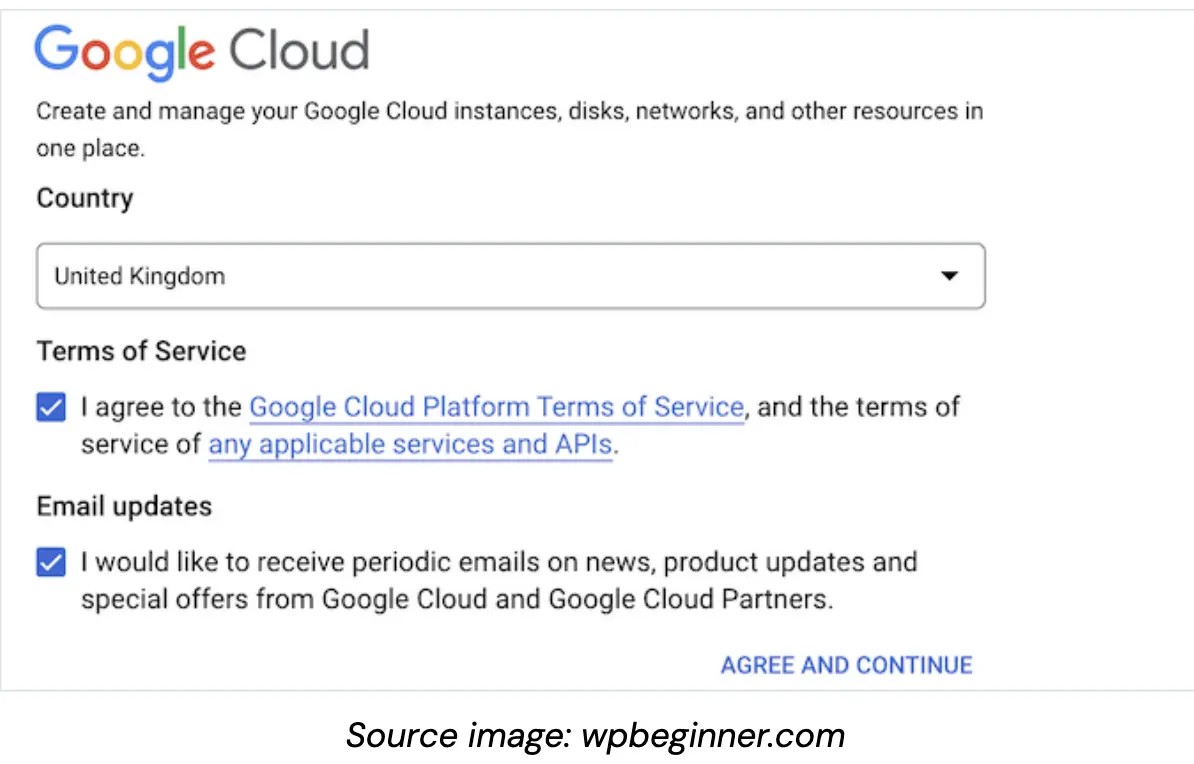
To initiate this, visit the Google Cloud Console website. First-time users must review and accept the terms and conditions and decide on their email update preferences. After agreeing to the terms, you’ll be directed to the main Google Cloud Console interface.
Your next step is to set up a new project. Look for the ‘Select a project’ option and click on it.

This action will prompt a popup window where you should choose ‘New Project’.

You’ll then be asked to provide a name for your project. This identifier is for your personal reference, so feel free to use any name that’s meaningful to you. On the same screen, you have the option to specify an organization and modify the location where your project will be created within Google Cloud Console.
Once you’re satisfied with the details you’ve entered, finalize the process by clicking the ‘Create’ button. This action will initiate the creation of your new Google Cloud Project, setting the stage for the subsequent steps in manually connecting Google Drive to your WordPress media library.
#2 Activate Google Drive API
With your Google Cloud Project set up, the next crucial step is to enable the Google Drive API. Navigate to the left-hand menu, select ‘Enabled APIs & Services’, and click on ‘Enable APIs and Services’.
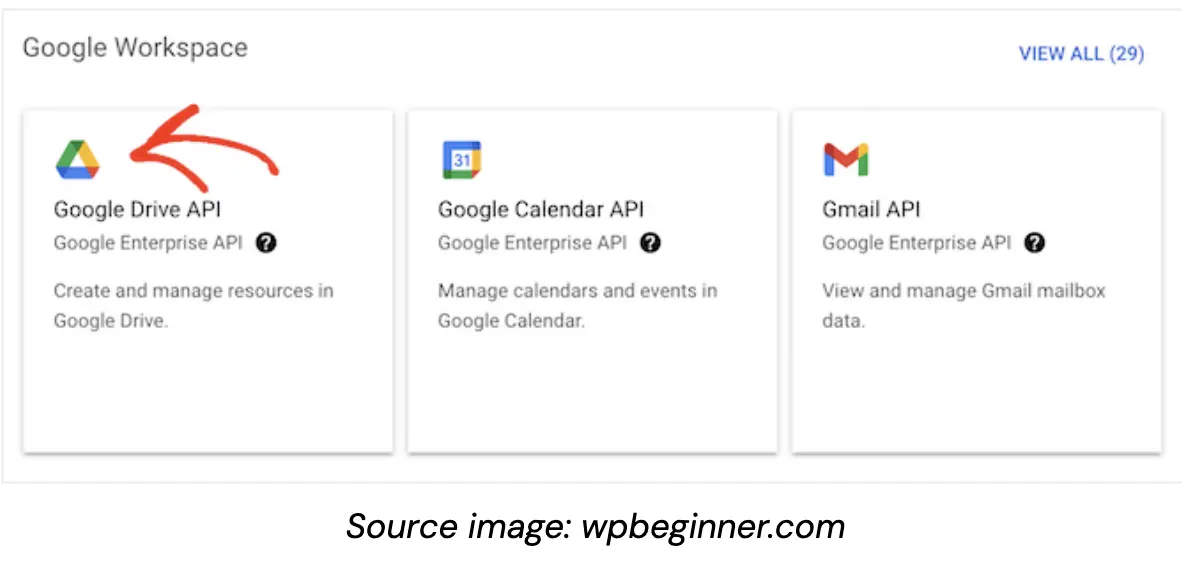
You’ll be presented with a comprehensive list of available APIs. While there are numerous options, such as the YouTube Data API for displaying your latest videos or the Calendar API for integrating Google Calendar with WordPress, our focus is on the Google Drive API.
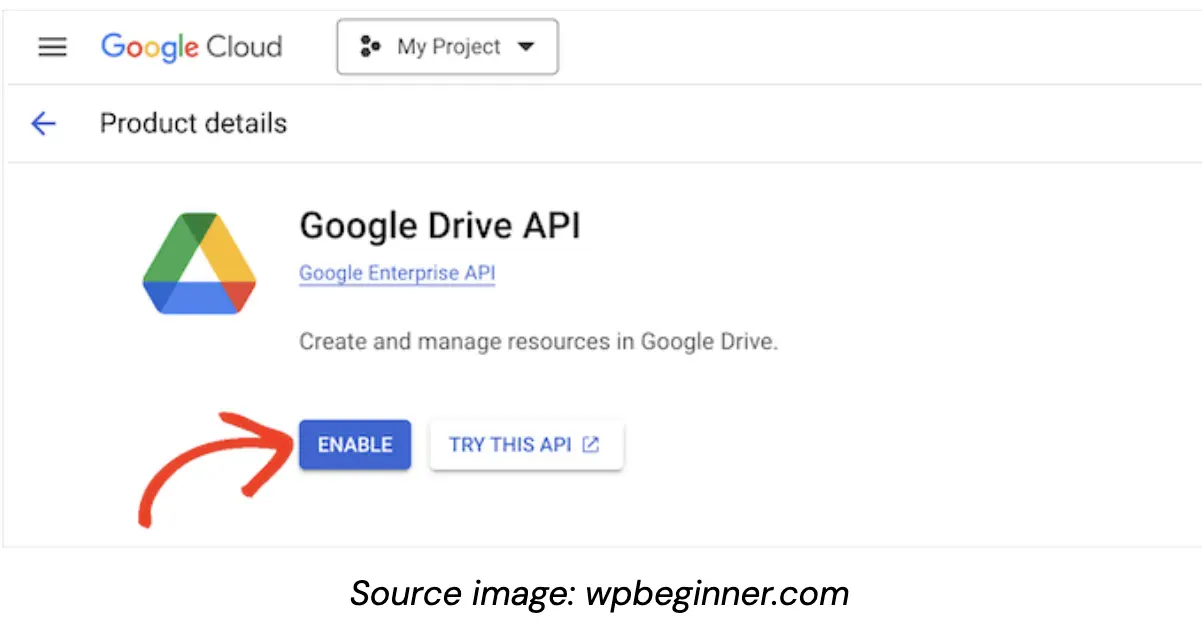
To locate it, scroll down to the ‘Google Workspace’ section and click on ‘Google Drive API’. This action will direct you to a new screen where you can activate the necessary key for WordPress to access your Google Drive.
To complete this step, simply click the ‘Enable’ button. This action will activate the Google Drive API, paving the way for the integration between your Google Drive and WordPress media library.
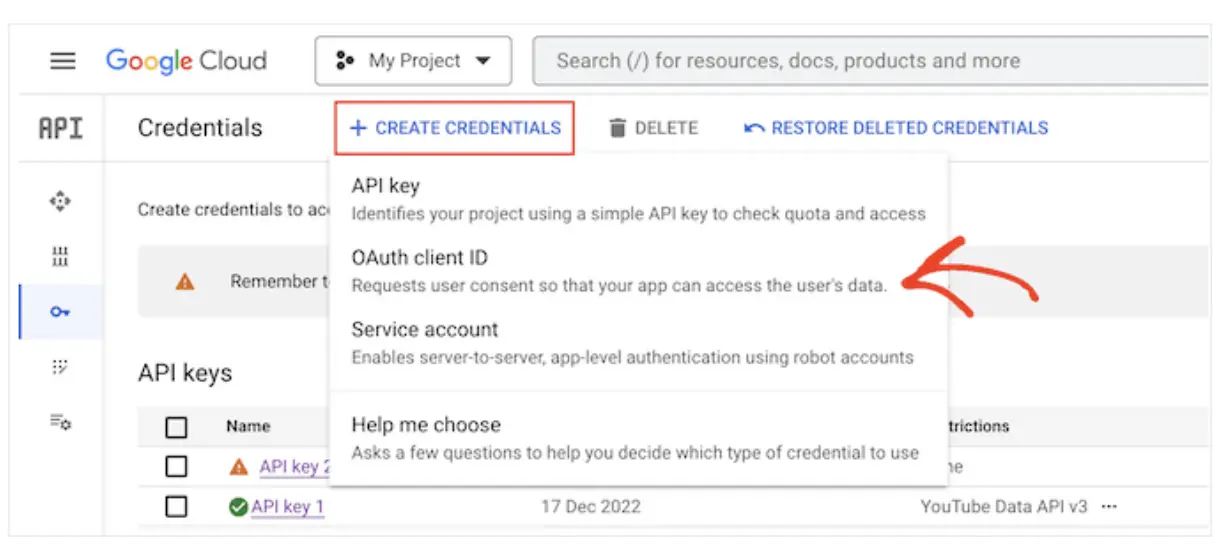
#3 Create an OAuth 2.0 Client ID
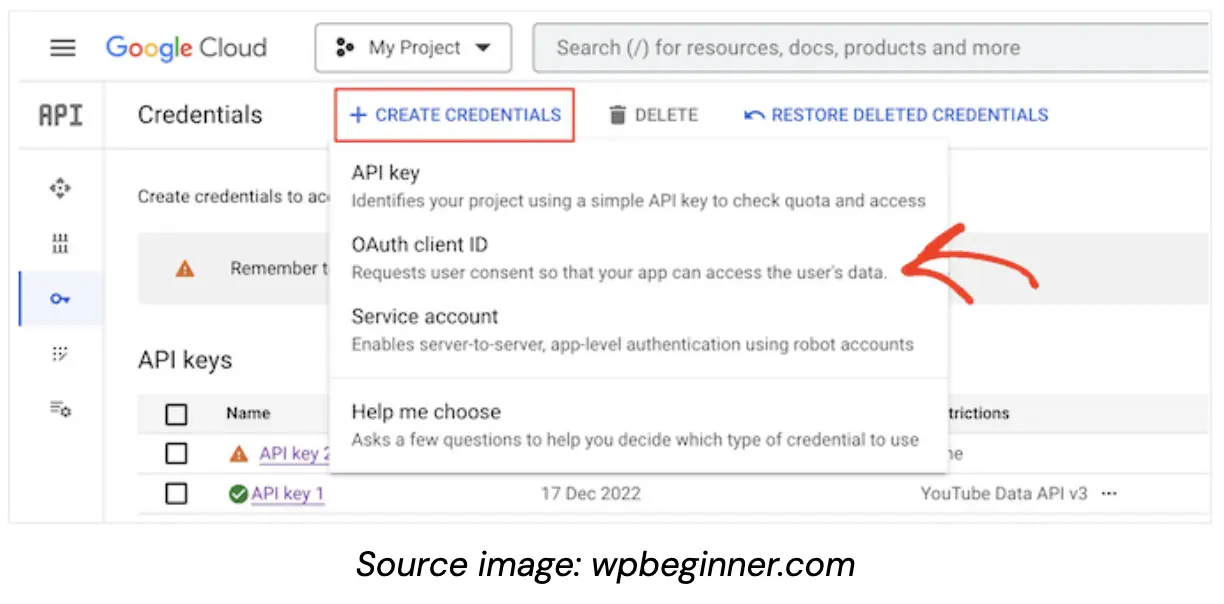
To create an OAuth 2.0 Client ID, access the main menu through the line icon in the upper left corner. Navigate to ‘APIs & Services’, then ‘Credentials’.
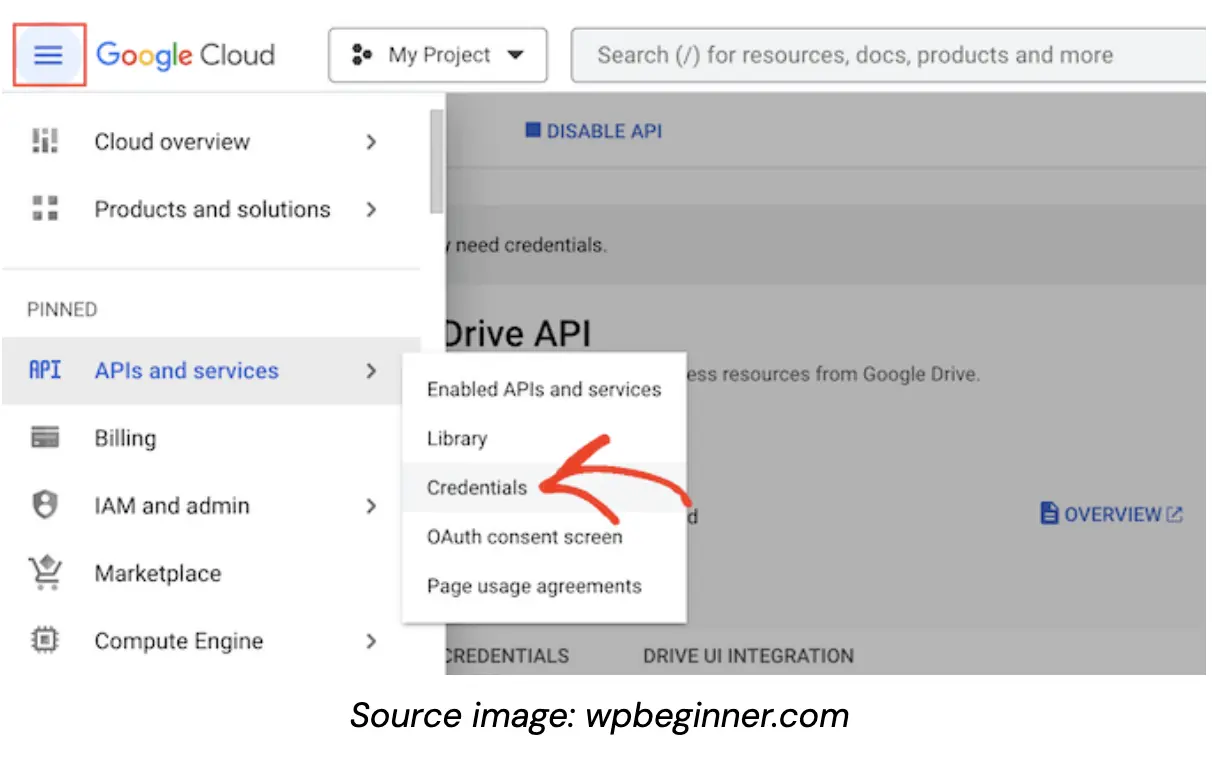
Click on ‘Create Credentials’ and select ‘OAuth client ID’ from the dropdown menu.
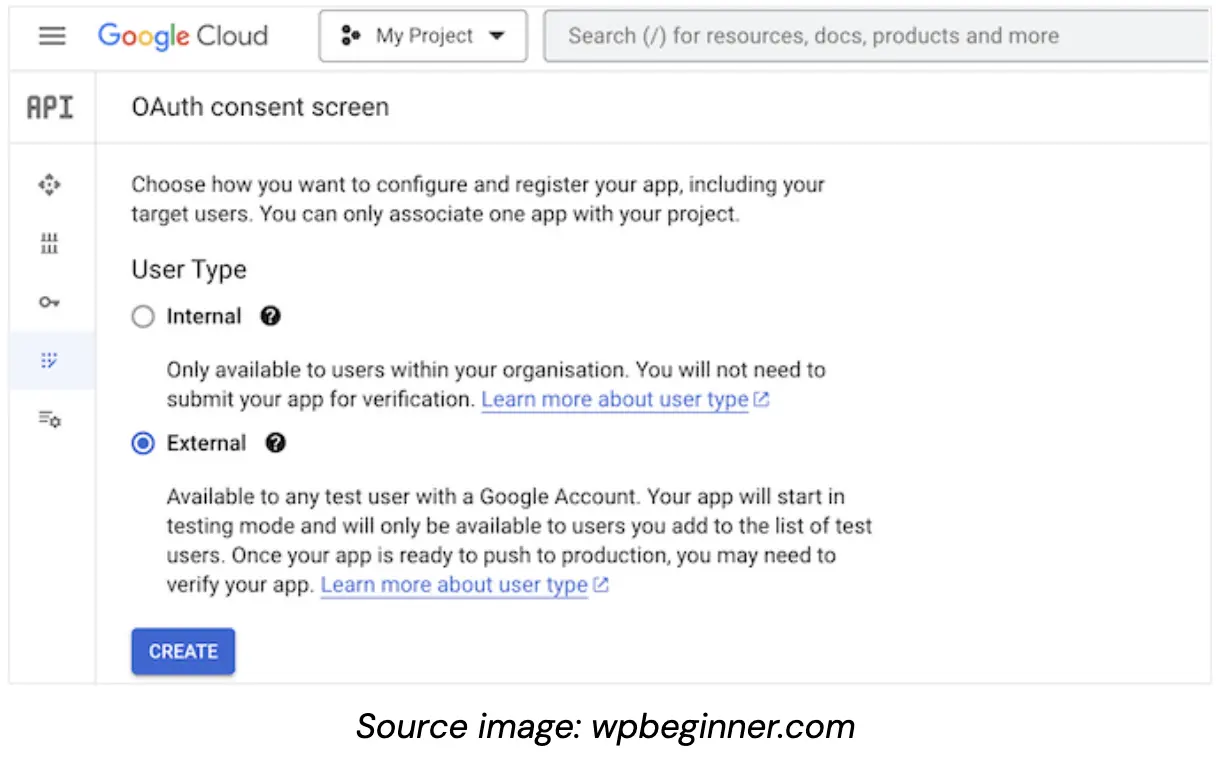
You’ll then need to configure the consent screen. Here, you’ll choose between creating an internal or external app. An internal app restricts access to G Suite users within your organization, while an external app is open to all Google account holders. After making your selection, click ‘Create’.
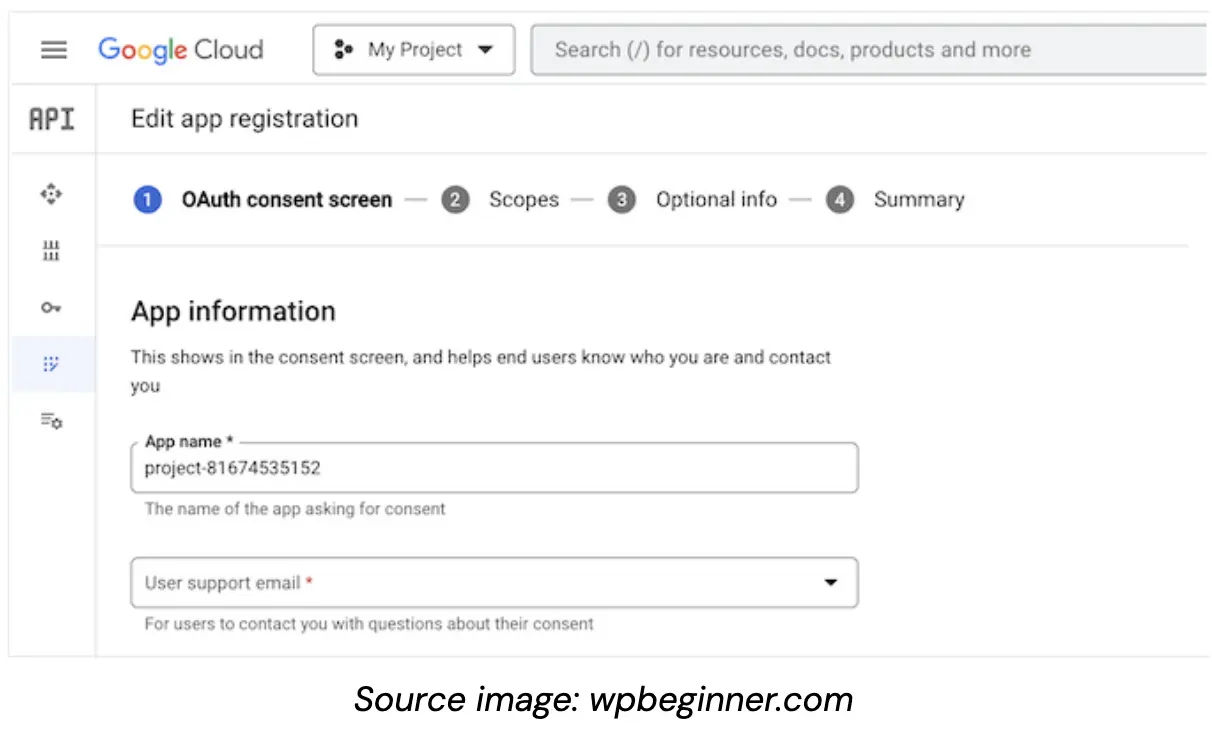
Next, provide details about your Google app, including your business email and the domain where you’ll use the application. Complete the form and click ‘Save and Continue’.
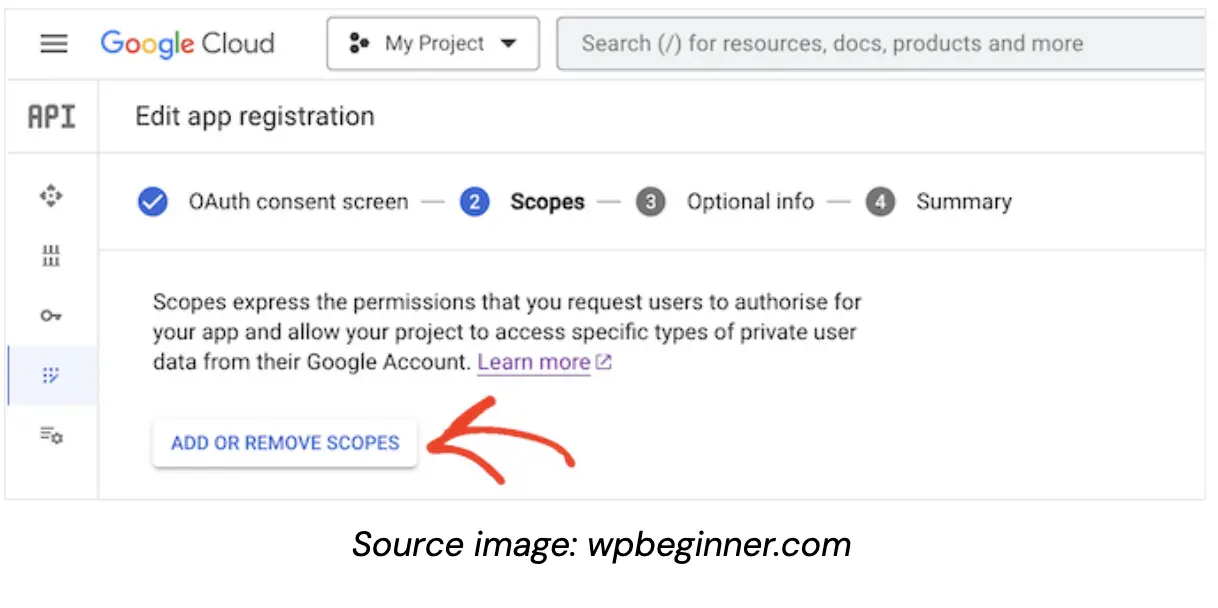
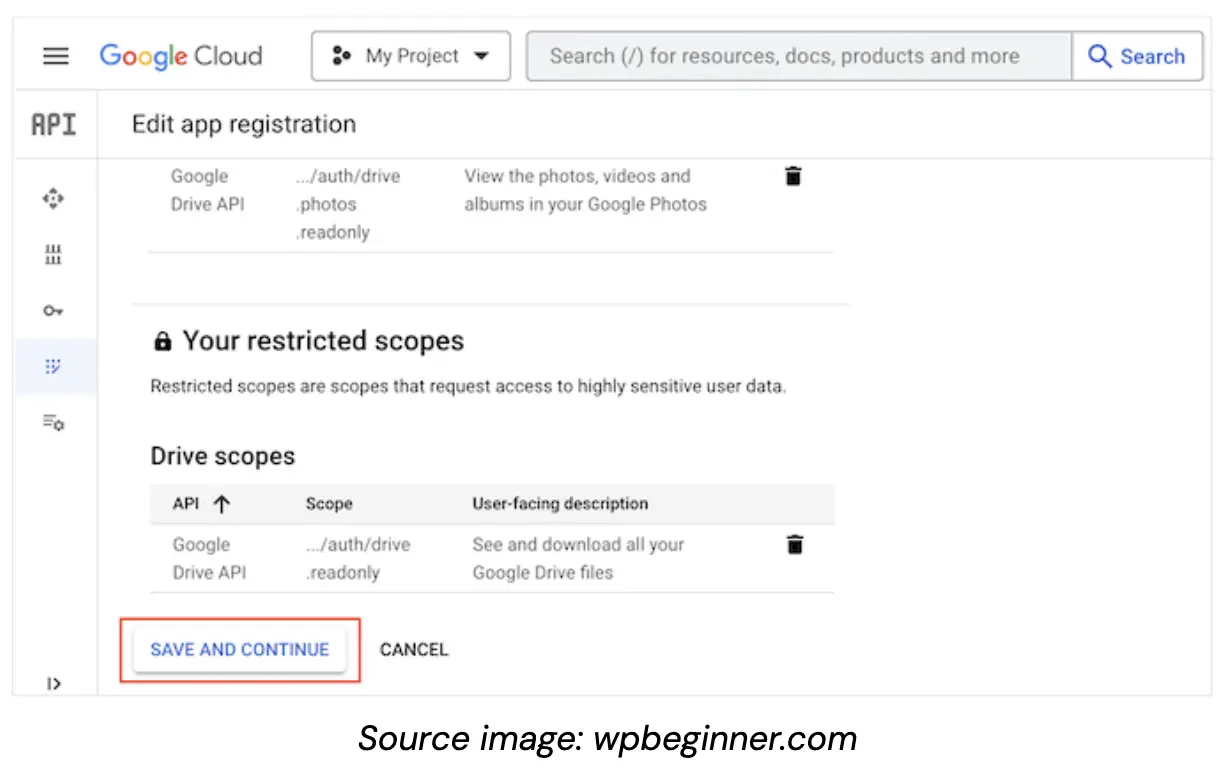
Now, you’ll define the app’s access permissions by adding scopes. Click ‘Add or remove scopes’ to view and select from the available Google Drive scopes.
When selecting scopes for your project, simply tick the corresponding checkboxes for the ones you need. It’s important to note that Google conducts a thorough review of any scopes labelled as sensitive.
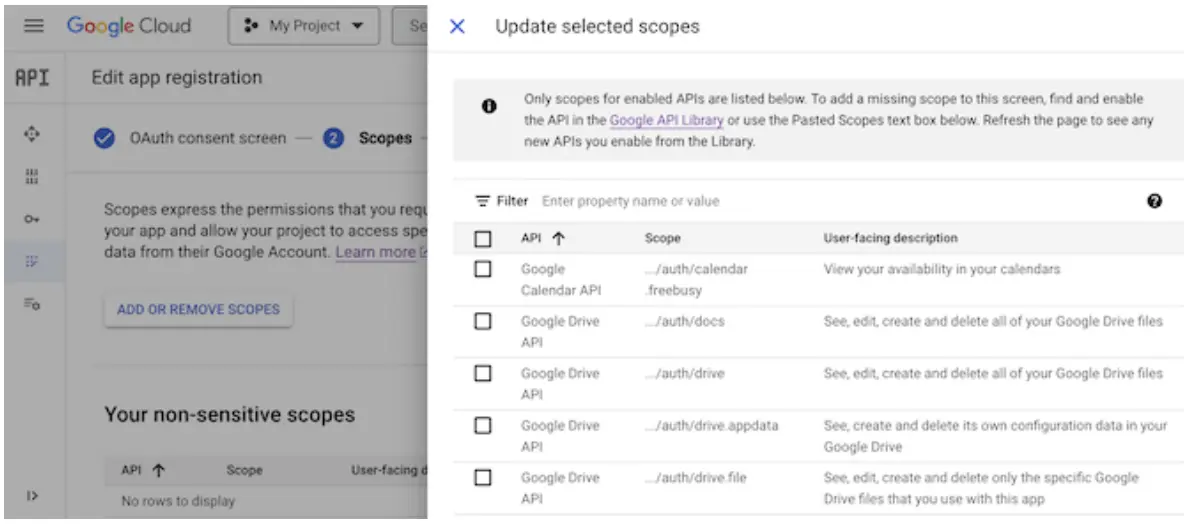
Be aware that Google will review any sensitive scopes. After selecting a scope, click ‘Update’, then ‘Save and continue.’
At this stage, you have the opportunity to provide additional details about your application, including its intended purpose and usage. While this step isn’t mandatory, offering this extra information can be beneficial.
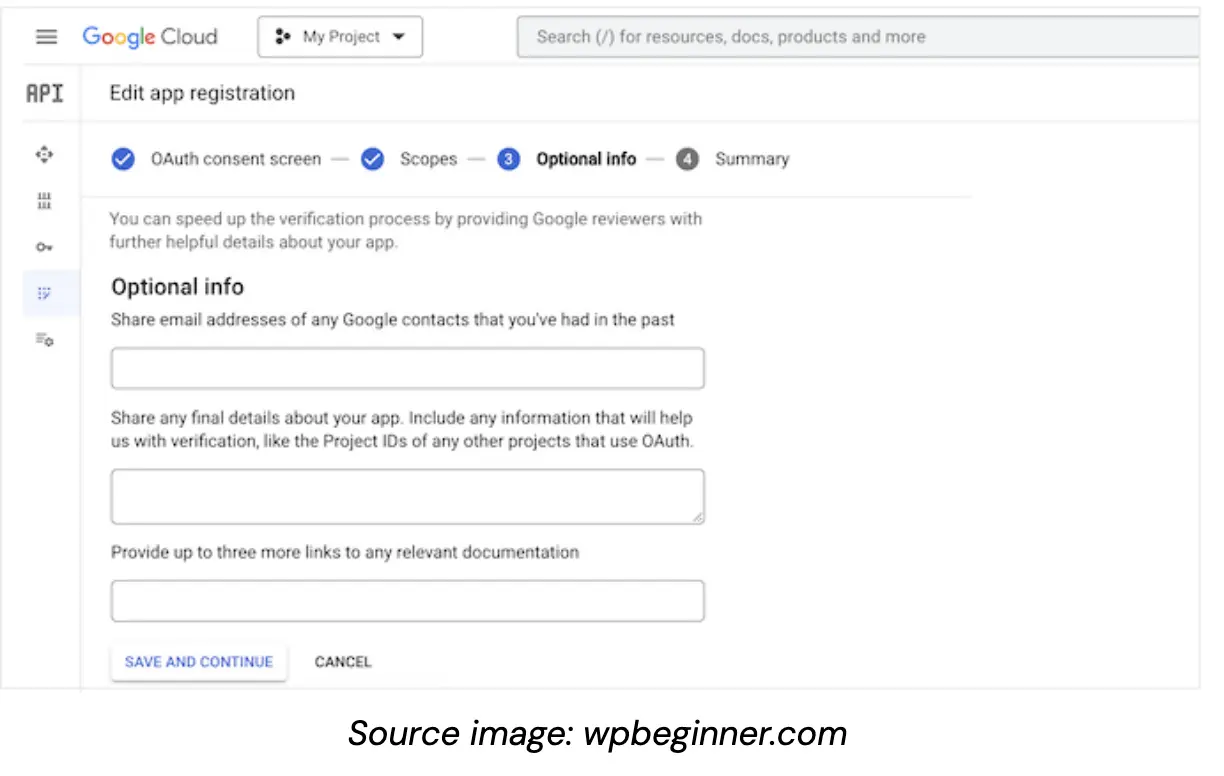
You may optionally provide additional information about your app and its intended use, which can expedite Google’s verification process. Once completed, click ‘Save and continue’ to view a summary of your entered information.
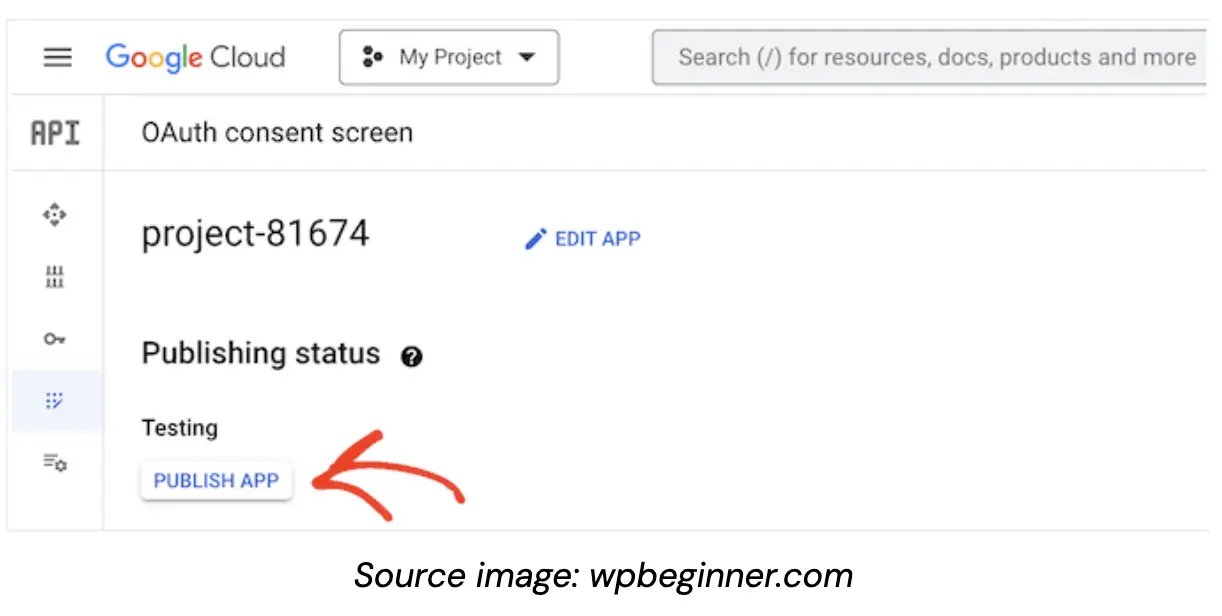
Return to the main menu and select ‘OAuth Consent Screen’.

You’ll notice your app is in test mode. To activate it, click ‘Publish App’.
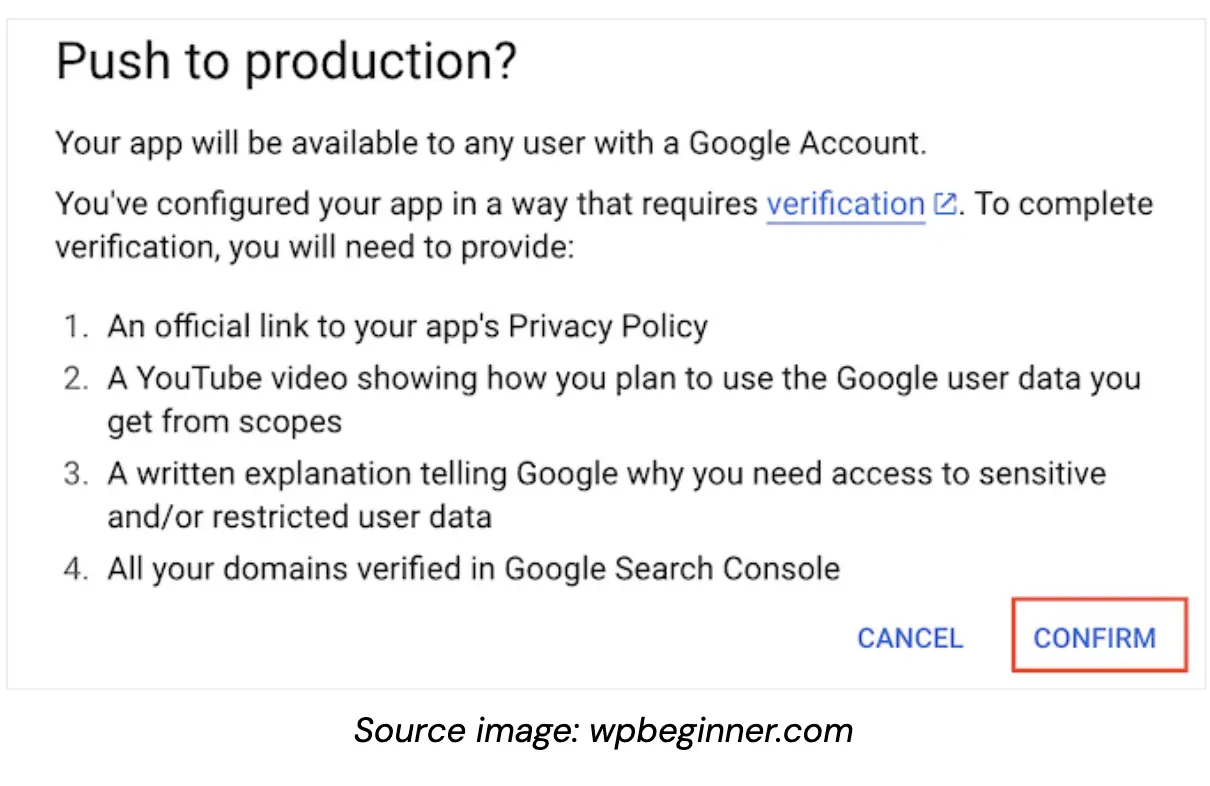
The Google Cloud Console will then outline additional steps required for verification, such as adding a privacy policy link and registering your WordPress site with Google Search Console. After reviewing this information, click ‘Confirm’ to proceed.
#4 Add the Client ID and Client Secret to WordPress
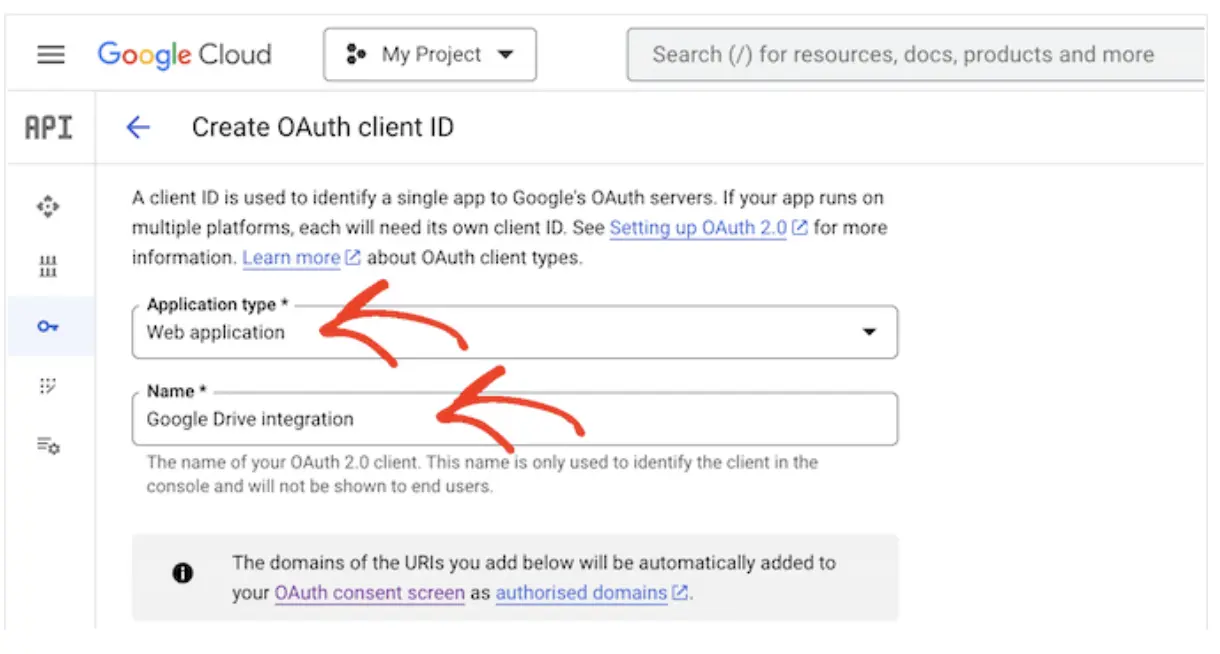
After completing the previous steps, you’re ready to generate the client ID and secret key. Navigate to ‘Credentials’ in the left-hand menu and click on ‘Create Credentials’. From the dropdown, select ‘OAuth client ID’.
On the subsequent screen, choose ‘Web application’ from the dropdown menu. Assign a name to your OAuth 2.0 client for reference purposes – this can be any name you prefer.
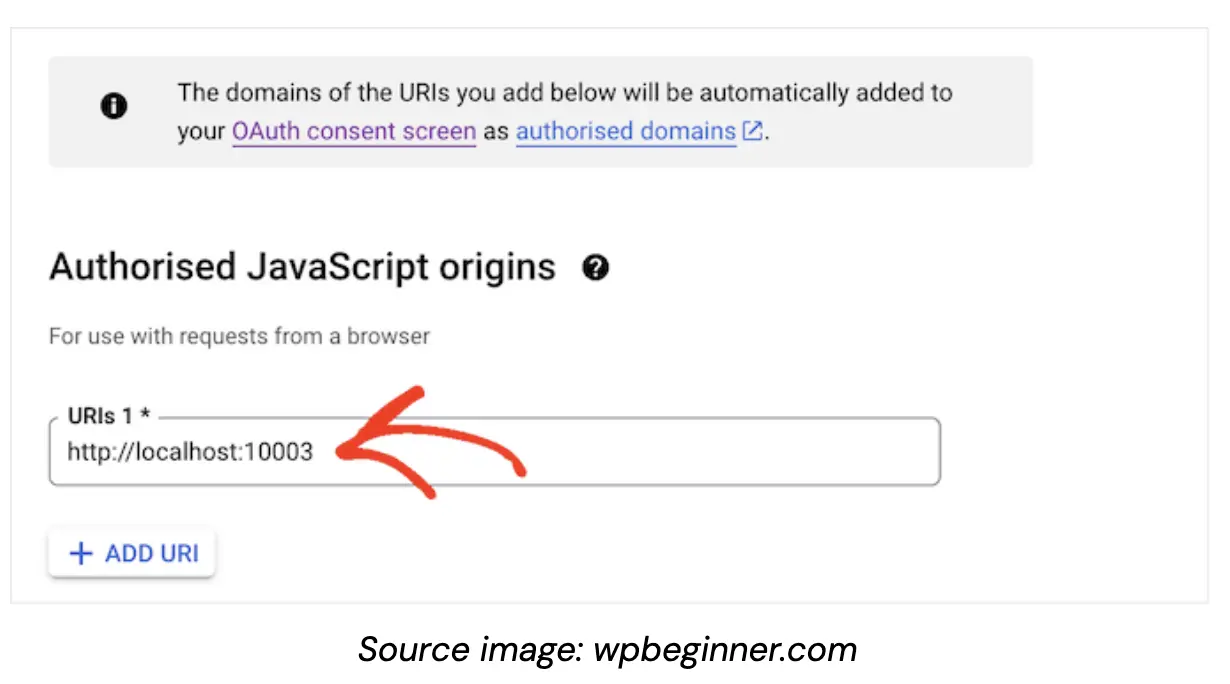
Scroll down to the ‘Authorized JavaScript origins’ section and enter your website’s domain name.
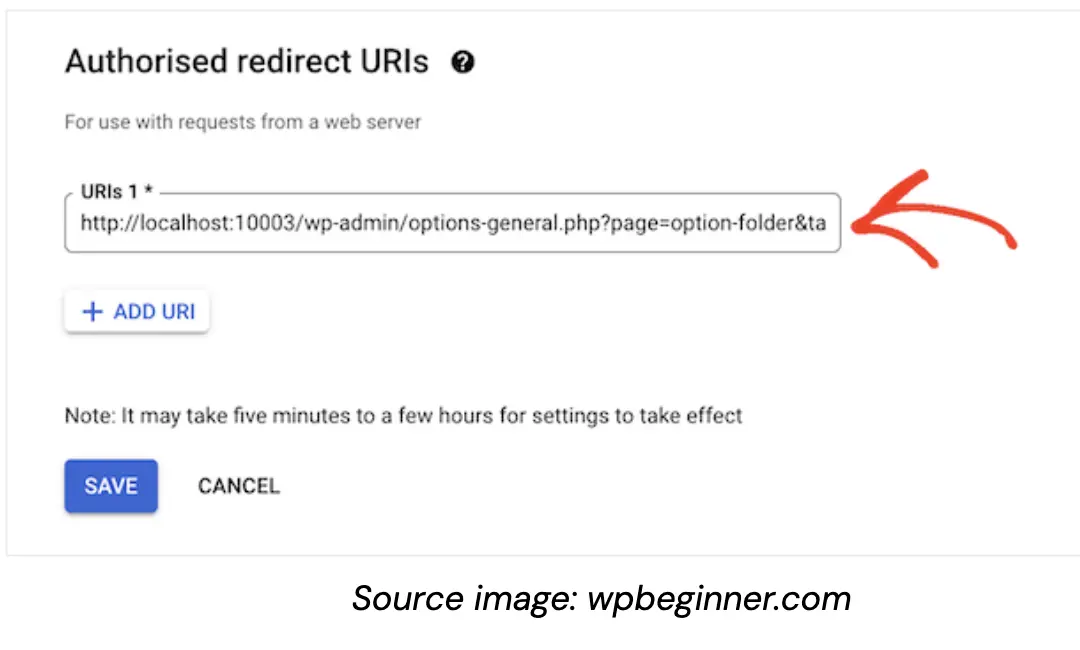
In the ‘Authorised redirect URIs’ field, input the following URL, replacing ‘https://your-domain.com’ with your actual domain:
`https://your-domain.com/wp-admin/options-general.php?page=option-folder&task=wpmf&function=wpmf_authenticated`
Proceed by clicking ‘Create’ at the bottom of the screen. Google will then display your client ID and client secret in a popup.
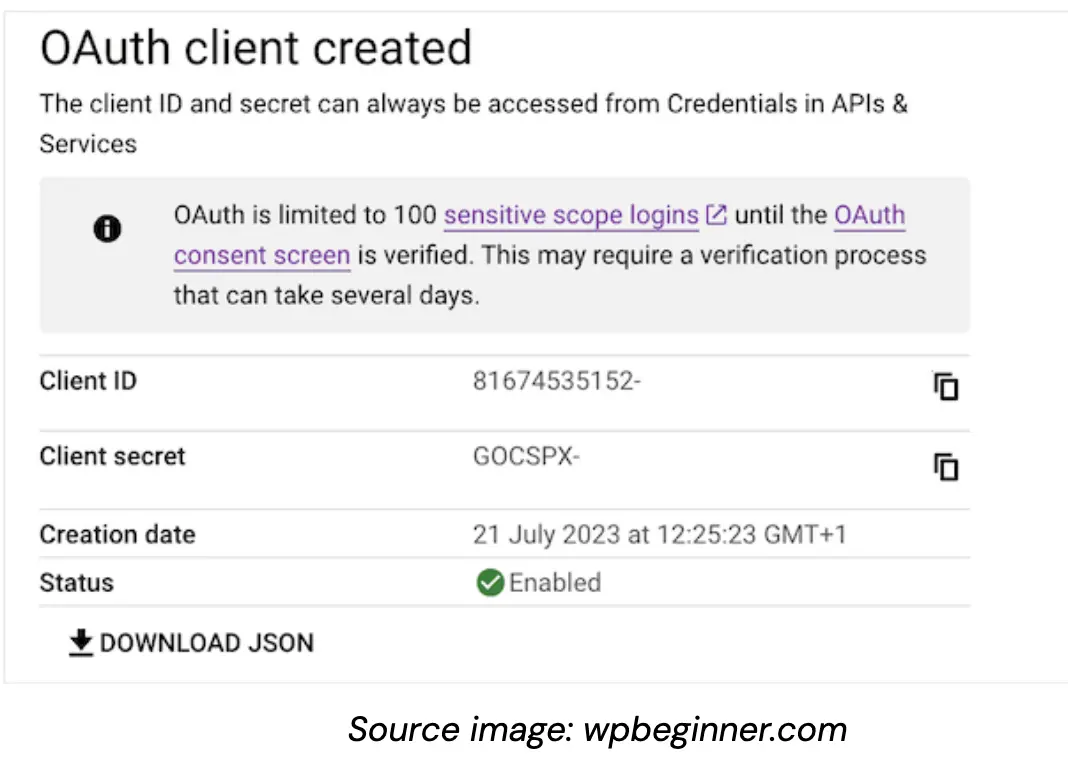
Securely record this information, as you’ll need it later. You can also download this data as a JSON file.
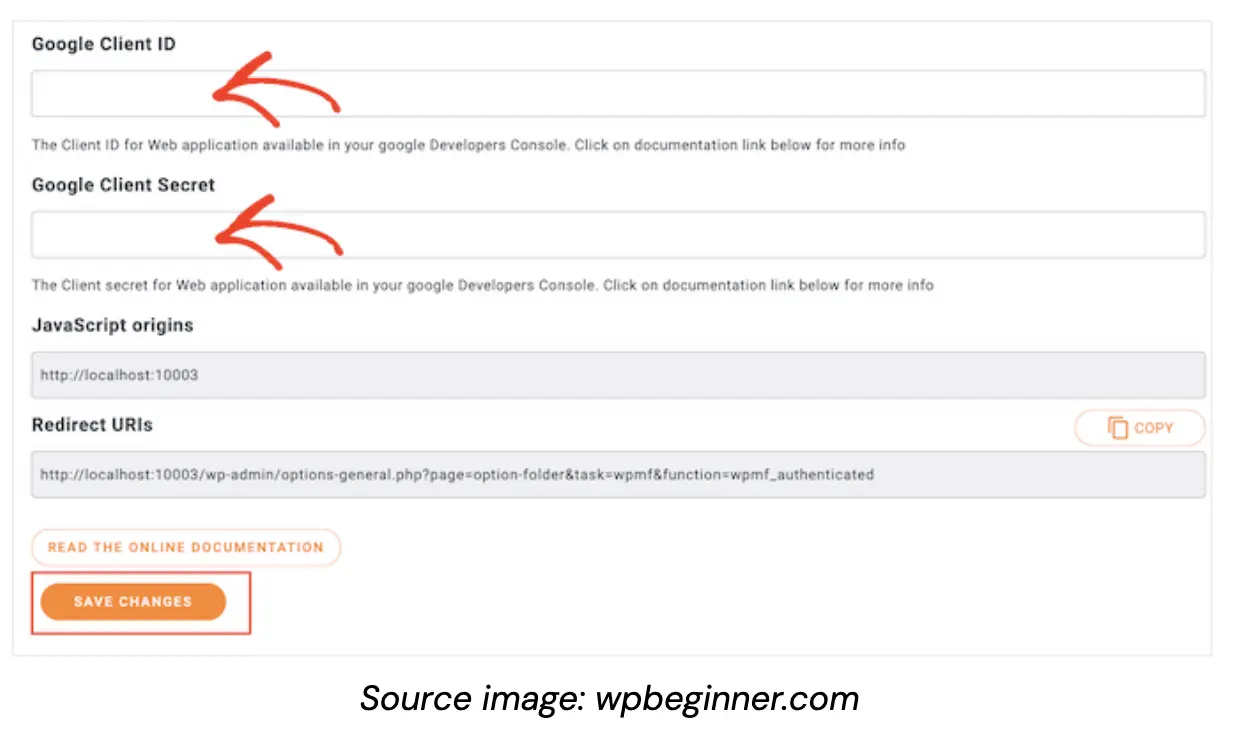
Access ‘Settings > WP Media Folder’ in your WordPress dashboard to incorporate the client ID and client secret into WordPress.
Select ‘Cloud’ followed by ‘Google Drive’ from the left-hand menu, then choose ‘Manual’.
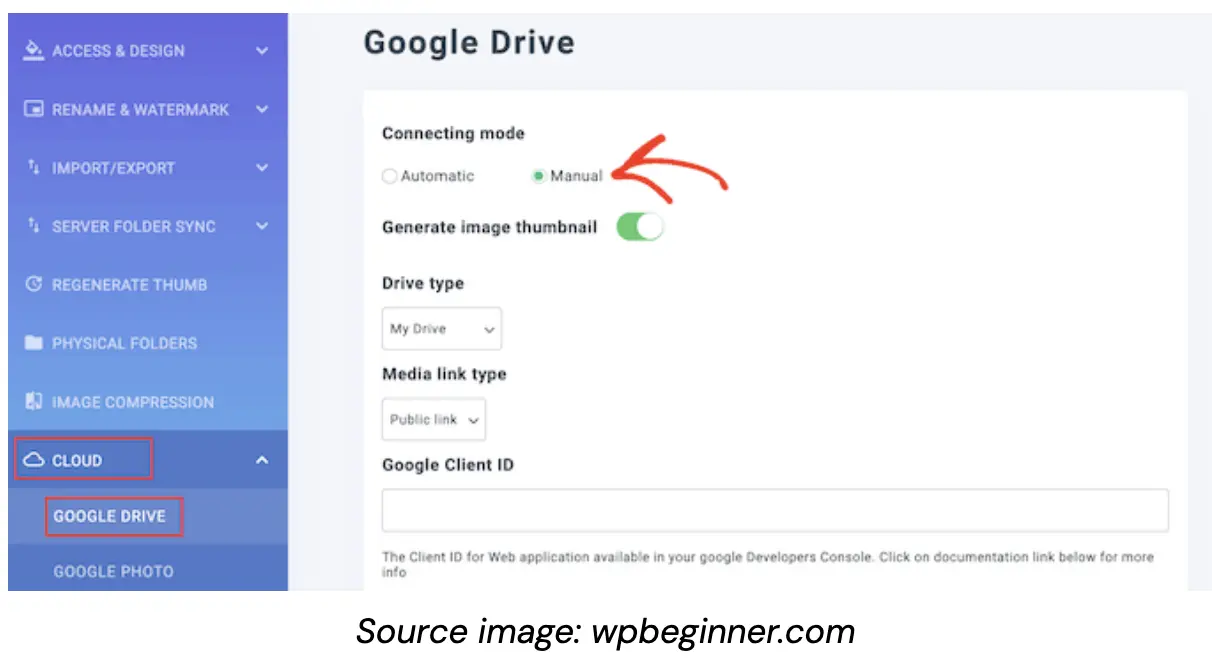
Paste the client ID and client secret into the fields labelled ‘Google Client ID’ and ‘Google Client Secret’. Then click on ‘Connect to Google Drive’.
In the popup window, select the Google Drive account you wish to use. Review the app’s permission requests, checking the box next to each one.
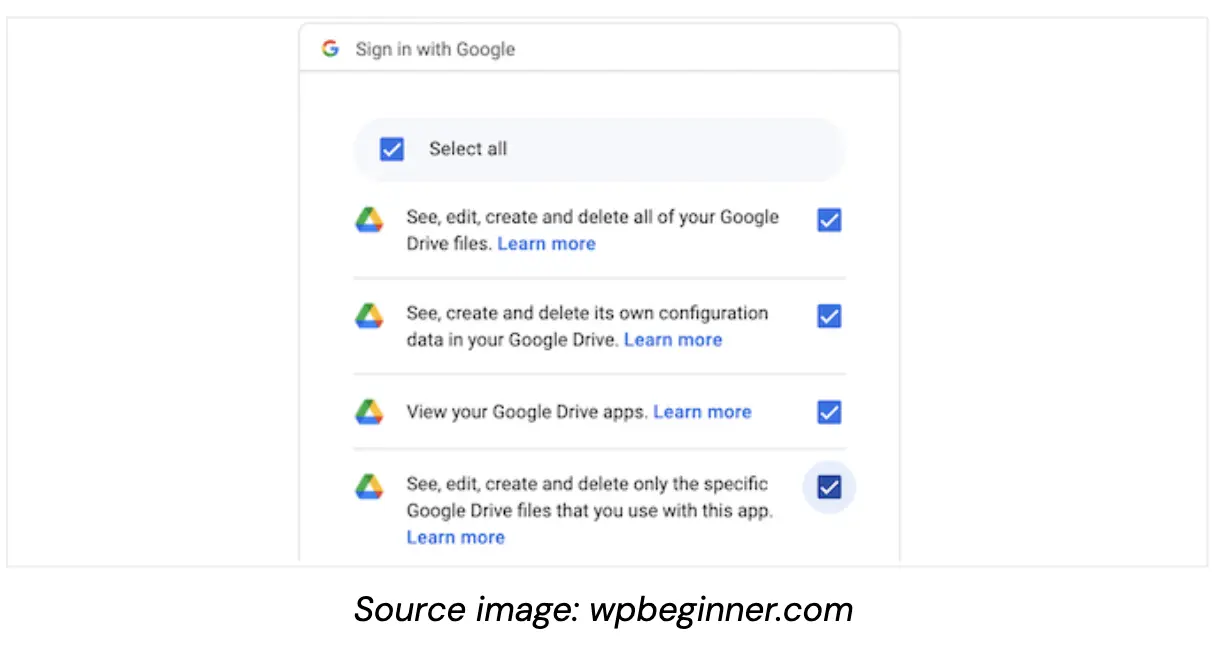
Click ‘Continue’, then ‘Save Changes’.
Congratulations! You’ve successfully linked Google Drive to your WordPress media library.
Conclusion
Connecting the WordPress media library to Google Drive offers a powerful solution for website owners and content creators to enhance their content management experience. This integration streamlines workflow expands storage capabilities, and simplifies file organization by allowing direct access to Google Drive repositories from the WordPress dashboard. The process can be accomplished either through plugins like WP Media Folder and its Cloud Addon or manually via the Google Cloud Console.
By leveraging the strengths of both WordPress and Google Drive, website owners can create a more robust and flexible content management system, ultimately saving time and effort in managing their digital assets.